Sunday, November 24, 2013

Color the Jump for Joy Angels with Copic Markers Part 1

How about a tutorial coloring these adorable angels with Copic Markers? 

As many of you know, I am a huge Copic Marker fan and unfortunately have a huge investment into these markers but feel it is totally worth it as I can refill them so they are truly a "green" investment.  Ok so maybe they are part of my art hoarding obsession.  LOL.  But worth every penny. 

I was coloring a bunch of these images and decided that maybe all of you would like to color right along with me using your Copic Markers.  Here is a hint, I am making Christmas Cards for friends and family. 

I started with E000, E00, E02 and layered them slowly blending with my E000 but I wanted more of a shadow and added E11 and E13 and didn't blend these out quite as much.  Stop back in a few days to see the next phase. 

Jump for Joy Angel Journal Page

Here I used my Jump for Joy Angel on a journal page where I hand lettered Merry Christmas and painted the background with watercolor and black permanent marker.  The angel was paper pieced, painted, and colored with Copic Markers.  Wouldn't this made a cute card?  Love her. 

Mixed Media Jump for Joy Canvas Ornaments


I love these canvases!!!  I paper pieced scrapbook papers to the angel's dresses and socks, added paint to the fronts of the dresses, socks, faces, hands, wings, halo, and hair to enhance the shading and highlighting.  Added Deco Art Glamour Dust Glitter paint to the dress to enhance the highlighting and then decided that the canvases needed additional color and stenciled additional color to the front of the canvases with Deco Art Tangelo Orange, and Light Buttermilk.  I used a small drill to drill a hole to attach a screw eye and ribbon to hang the ornaments.  I then cut out a piece of scrapbooking paper the size of the canvas and glued it to the back of the canvas. 

I think these will make great gifts for my friends and were so quick and easy to do because I used my new Angel Stamps from www.treasuredtimesrubberstamps.com

If you would like directions for painting the angels go to www.chartmandesigns.com and look at the painting pattern for the Jump for Joy Angels. 

Stay tuned for additional projects using these stamps and a tutorial on coloring them with Copic Markers. 

Tuesday, November 19, 2013

Jump for Joy Angels Mixed Media Canvas Tutorial Part 4

Here you can see the Washi Tape on the sides of the canvas and two of the angels stamped on book paper and decoupaged onto the canvas.  I still have not added the orange to the canvas but promise you in the next post will show that added, the angels painted, and the ornament ready for the Christmas Tree. 

Are you working along side of me? 

Jump for Joy Angels Mixed Media Canvas Tutorial Part 3

Here they are..................  My brand new stamps from the Jump for Joy line of stamps!  I love these!  The next few blog posts will show how I used these stamps in three different projects.  I'm finishing the ornaments on the mini canvases and then will share a card that I finished, and a journal page which I added one of the angels to which may make a great Christmas Card. 

Hope, Faith, and Love and I love these.  I hope you will too.  Head on over to Treasured Times and purchase the stamps or go to my website www.chartmandesigns.com and purchase the painting pattern.   


Stop by tomorrow and see how I've added the stamps to the mini canvases, soon to be ornaments. 
 
What do you think? 

Jump for Joy Angels Mixed Media Canvas Tutorial Part 2


Here are close-ups of the mini canvases after I have added decoupaged papers, Washi Tape on the edges, added the Roller Doodle Stamp and some turquoise blue acrylic paint blended onto the canvases.  Deco Art has a great Deco-Pauge product which works great.  In the past I've had problems with decoupage bubbling up but since I started using an old room key/credit card to smooth over the decoupaged areas have not had a problem.  Seems to work well pushing out all of the air bubbles under the papers. 

I think this needs to have some orange stenciled areas added to it but will add those once I've added the stamped images.  I'm also going to add some GLITTER!!!  Wahhoooo!!!!!  Love the bling. 

Sunday, November 17, 2013

Jump for Joy Angels Mixed Media Canvas Tutorial

Ready for another Tutorial?  I am so happy to announce that my newest stamps have arrived and they are fantastic!!  These angels have proven to be very popular as a painting pattern and now are equally popular as stamps and I am so grateful to all of you for your overwhelming support of this design.

I've decided to do another tutorial showing you how to use the stamps in a mini mixed media canvas which can be used as an ornament or as a darling canvas on a mini easel.  I purchased 4"X4" mini canvases and began by developing a canvas using scrapbooking paper, book paper, music score, Washi Tape, paint, and a variety of stamps including my line of Jump for Joy Angel Stamps which can be purchased at http://treasuredtimesrubberstamps.com/products/our-stamps/hartman/

I'm actually going to paper piece the angels and use paint to add detail and I'd love for you to join me in this project.  If you already own the pattern from www.chartmandesigns.com you can use that instead of the stamp but the stamp makes it sooooo easy to develop the design. 

Here you can see the canvases with the scrapbooking paper decoupaged onto the canvas, Washi Tape around the edges of the canvas and used my new Roller Doodle Stamp from Glitz to add some interesting detail. 

Are you ready to join me? 


Tuesday, November 12, 2013

What's On My Desk?

I'm trying to journal everyday and having a hard time finding inspiration.  So I thought why not journal what is in front of me every day and sketched out what was on my desk that day.  It was fun and certainly appropriate for my "Day Job". 

Do you journal every day?  Let's have a conversation. 

Saturday, November 2, 2013

Back to Drawing my Awesome Life

I'm totally loving this class so thought I'd post my title journal page.  So fun and enjoying it soooooo much.  Needless to say it inspired me to purchase more art supplies.  As if I needed a reason!!!  Joanne Sharpe is contributing to my art hoarding obsession.  LOL.  Can't wait to try them out on all of you.  Who knows it might even spark a tutorial sometime soon. 

This is painted using watercolors on a 5"X8" sized Moleskine Journal and used Faber Castel pens on the lettering and border. 

Journaling Process

I'm in the midst of taking another Joanne Sharpe class which is a journaling class and I love it!!!!!!!!!!  So much fun.  If you have not taken any of her classes I recommend them highly!  She is a former teacher and really understands how to connect even though it is an online class.  I can't imagine how great she is in person.  I'm only into the first week of class but am already way behind.  LOL.  Of course it doesn't help that I am still finishing up the past two classes that I took from her.  That is the beauty of online classes, you do them at your own pace, and for Joanne's classes you have access to them for the lifetime of the class.  I love that aspect.  I can already see an enormous amount of growth in my artwork since I began taking online classes. 

This is the first project that I am sharing, it is completed on Bristol paper and in true mixed media fashion, used water soluble graphite, watercolor, and Tombow Markers.  I wanted to see how watercolor responded to the Bristol paper and I actually really liked it.  So...... we'll see what happens.  I was pretty happy with it, of course would change some things if I ever did it again.  This page came at the end of a loooonnnnggg Halloween week at school, the kids are always crazy during this holiday, and really needed some calm in my life.  LOL.  So I was dreaming of a quiet cup of Chai. 

What do you think?

Sunday, October 20, 2013

Aloha and Merry Christmas using Stencils and Gelli Printing


Aloha and Mele Kalikimaka which is Merry Christmas in Hawaiian.  A few years ago my husband and I traveled to Hawai in November right before Thanksgiving and noticed how the islands were beginning to prepare for the holidays.   We got there in a massive rainstorm and our taxi driver mentioned that it was their rainy season and the weather had been a little chilly, naturally we were a little concerned as we were counting on nice weather since we were coming from Montana.  Not to worry though we thought the weather was perfect.  The locals were all wearing light sweaters or sweatshirts while we had t-shirts and shorts on and thought the weather was perfect, you could easily tell that we were not locals.   I really felt at the time that I could spend Thanksgiving and Christmas in Hawaii and enjoy 80 degree weather.  What a hardship.  (Giggles and Grins)  Santa was displayed in Hawaiian finery and Rudolf and his friends were dressed for the beach and I thought how fun!!!!   I was inspired to design a Hula Girl and thought how fun would it be to design a Christmas card with a Hawaiian theme. 

During and earlier post we discussed using stencils for a background to be used for a fall themed card and I thought that this post might be a good time to do something similar but geared toward Christmas and immediately thought lets go HAWAIIAN!!!!  Ok, ok, I will also show something more traditional as well.  LOL.  But why not use some of the techniques that we’ve discussed to design a card for the holidays or how about gift tags. 

I adore using my home made sprays as they make such short work of any project and when used in conjunction with stencils can really be stunning.  When I start designing papers to use as background or even as journal pages I always do a number of them so I have a stack to go to when I am starting a new project.   I also save my scraps as they can easily be used in a card.  You can see in the following card that I used my hula girl stamp, home- made sprayed scrap- papers in the background, colored Monstera Leaves and cut out the word Aloha for the sentiment.  I used my Copic Markers to color this but could easily have been painted.  You can see the stamp that I used for this card at http://www.treasuredtimesrubberstamps.com/products/our-stamps/hartman/  I love her and have used her in a card in an earlier post. 
 

The Santa card uses my Santa Face, the line art for this is found on my blog under the archived November 2010 section.  I attached Santa’s face to homemade patterned paper, a tag which has some stenciling and Gell Printing on it; how fun to cut out tags from those gorgeous patterned papers that you are going to design.  We now have a lovely card and would make a gorgeous gift for anyone.  Just add some lettering and bit of glitter and Amazing!!!  Ok so they aren’t terribly traditional but fun none the less. 


Pantone Fall Forecast


Fall in in full swing.  As my husband and I came home today from a long weekend we enjoyed the fall colors on our 5 hour car trip.  It was gorgeous!   I wanted to stop and take photos along the way but we were both so tired that each one of us just wanted to continue on.  I am hoping to get up into the mountains this next weekend so can share the gorgeous colors of the Tamarack Pine Tree!!!  Amazing this year!!!!!!!!!
 
With each new season comes the newest color choices as is determined by Pantone, that mysterious group of “it” people who determine what the home wares and clothing industry will feature as the current color trend.  Yes, I admit I fall prey to the color forecast for each season.  As a designer I like to see what colors are going to be hot for that particular season and try to them into my designs.    I looked at the selection of colors this year and was particularly taken; warm rich tones which had me heading to my paint container to find those paint colors.  Then I thought about incorporating the new fall colors with a stenciled canvas.  HMMMMM…….  See you soon.  I have to get busy creating, the warm Sage Green is calling me.  Take a look at the Pantone web site to see for yourself the gorgeous selection of colors forecast for the year. 

Stencils used in either Mixed Media, Paper Crafting, or Decorative Painting


I love stencils!!!  I can’t tell you how much I love them.  Why wouldn’t you want to incorporate something into your painting that requires very little effort from you and is so versatile?  Part of my “art hoarding” compulsion is my rather large box of stencils which sit right next to my painting table on the floor.   I want them easily accessible and naturally have to keep them where it is easy to just grab one.  I warn my family to watch where they step when they come into my painting area; otherwise I am not responsible for anything that might occur.  LOL.   I should post that on the door. 

 
As I mentioned in an earlier post there are a number of really wonderful stencil companies on the market right now.  A number of Decorative Painting artists have moved into the area of stenciling, Laurie Speltz, Tracey Moreau, Renee Mullins, and Patty Rawlinson to name a few that I have personally had experience with and their stencils are all fantastic.    Did you know that there are other companies that are specializing in stencils, many of which only sell stencils?    Two of my favorites are Crafter’s Workshop and Stencil Girl.  Like the stencils I mentioned above they are made out of a very durable material which will hold up to repeated use and clean up very nicely.  These companies work with a number of artists in the art world to design their stencils and offer an incredible selection. 

 
Stencil Girl is owned by Mary Beth Shaw who is an author and published artist, many of you may have heard of her.  She works with a wonderfully talented group of artists to design the stencils that she offers on her website http://stencilgirlproducts.com/  There are a wide variety of stencils that she carries from stencils to help you draw a face to random patterns for backgrounds and in a wide variety of sizes.  I have a number of her stencils and love them all but one of my personal favorites is the Spider Web Stencil.   They are high quality and will hold up to repeated use and you might just find something that you can’t live without.  I know I have a number on my wish list right now. 

 
Crafter’s Workshop is another of my favorite stencil companies.  They too have an incredible assortment of stencil designs and I often find myself adding the new releases to my wish list and counting my pennies until I can order.  http://www.thecraftersworkshop.com/The_Crafters_Workshop/Home.html  One stencil that I recently used on a canvas is a 6”x6” sized template called Mini Busy Bees and it was darling.  I can see myself using this one frequently.  Take a look at their border stencils, all I can say is AMAZING!!!  Whether you are a painter, card maker, journal enthusiast, or a crafter you are going to find stencils that you just can’t live without.  I’m sure you too will be adding to your stash and causing your family concern over your “art hoarding” tendencies. 


Jump for Joy Angel Wood Pieces

They're Back!!!!!!!!!!!!!!!!!  These quality wood pieces are so worth the wait, the quality of these is amazing!  I have been so thrilled, overwhelmed, and grateful for the response to these little characters and I have the wood pieces back in stock.  I couldn't believe that these angel wood pieces sold out so quickly, if they sell out again I can easily get them back in stock.  No Worries, my supplier is amazing! 

Watch for a new Christmas Ornament set that is ready to be out on the market and think..... Santa, Mrs. Claus, and Mr. and Mrs. Elf.  There is a bit of a theme going on here.... Couples.  LOL.  Seriously these are a mix of paper piecing and painting and they are so adorable.  Can't wait to share them with you and of course I will carry the wood pieces for the set.

Tuesday, October 8, 2013

Jump for Joy Frankie and Spring Erik Stamp Card Samples

During my last post I mentioned that I was busy on Saturday demoing my line of stamps at Memory Lane Scrapbooking for National Card Making Day.  What fun I had!!!!  Here are two additional cards that I made using two of my stamps.  My goal is to make a card for each stamp that I have, not quite there yet though.  LOL. 


This card uses Spring Erik and one of the sentiments, You're a ray of sunshine on a cloudy day!  I put this together on a watercolor card using  my Dylusions Sprays in the background, using clean water "ghosted" or lifted the texture in the background using a Dreamweaver's stencil.  Used Washi Tap on the base and stamped the border.  Behind Spring Erik you can see Gelli Prints cut out using my Spellbinder's Dies.  I colored Erik with Copic Markers. 


 Here you see Frankie colored with Copic Markers, the background colored using shades of blue Tombow Markers and washed onto the background.  I stamped texture using a variety of stamps from my Tim Holtz collection, cut out the shape behind the house using a Gelli Print and my Spellbinder's Dies.  The house I cut out of black cardstock and added Washi Tape to the  base of the card. 

Monday, October 7, 2013

Fall Card Sample using Fall Erik Jump for Joy Stamp

Here are two cards that I did using Fall Erik from my line of stamps available at www.treasuredtimesrubberstamps.com I wanted these cards to have the look of a chalkboard and used my white Gel Pen on black cardstock, added Erik colored using Copic Markers.  Added some rub-ons and embossed the leaves.   I have been working on my lettering skills because I want to add more of my own art lettering to my projects and hand lettered both of these samples.


The background for this card is another stenciled background paper using a variety of layered Crafter's Workshop Stencils using a variety of acrylic paints.  What do you think?


Sunday, October 6, 2013

Jump for Joy Stamps and Cards Aloha

Phew!!!  It has been a busy Fall for us and October is looking like it will also be a busy one.  I enjoy being busy but it also puts a crimp in my painting and designing time.  LOL.  Needless to say my blog posts have been sporadic. 

I was fortunate enough to  have been asked to spend some time Saturday at Memory Lane Scrapbooking sharing my new line of stamps on National Card Making Day with Stacy and her card making group.  It was a blast and what amazing projects those gals produced, what a talented group they are.  The cards they were making were simply inspirational. 

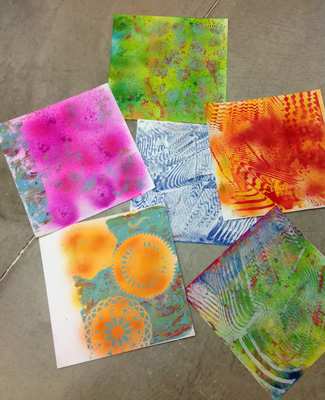
I had made a few samples of my cards to share with them and tried to "think outside the box" using techniques that they may not have been familiar with.  That was hard because I have seen the samples of the cards that they make and I was a little intimidated to say the least.  LOL.  I used background papers, made by me, which used techniques that I use frequently in my art work with layered stencils, my home made sprays, and Gelli Printing.  They all seemed very interested in the stamps and some of my techniques.  Most of you have seen my background stenciled papers so I won't share all of the ones that I used but you can access those in my archived blog posts.  However I did a new one to use with my Hula Girl Stamp.

This background began with spraying Dylusions London Blue, Vibrant Turquoise, Calypso Teal, and Pure Sunshine randomly onto the background.  I then sprayed clean water around to make the colors blend and blotted with a paper towel some of the areas that I wanted to be less vibrant.  I then sprayed clean water through my Crafter's Workshop Mini Punchinello stencil to "ghost" some images and blotted them with a paper towel.  A technique that Dyan Reaveley uses frequently with her line of sprays which you can see on You Tube.  Love her!!!!  This gave the background a starting point for texture.  I then chose some random paint colors, yellow, blue, and white and began to stencil using the Mini Punchinello to add more depth and texture.  When everything was dry I stamped my Aloha stamp onto the background randomly.  As I told the gals yesterday you could easily use what ever you have at home for sprays and could easily make your own with any re-inkers that you might have if you don't have the Dylusions brand of sprays. 

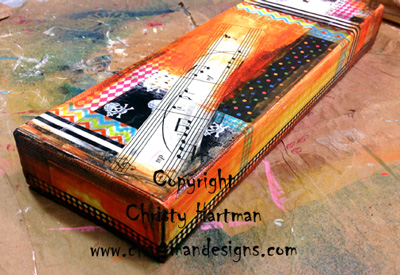
Here is the finished card and you can see the background as well as the layered background elements that I cut out using my Spellbinders Die-cuts and my Gelli Prints.  I thought it turned out really well and I was delighted with it. 

Tomorrow I will share a couple more cards that I did as samples using the stamps that I was really pleased with and had a great response from the gals at Memory Lane Scrapbooking.   Thanks to all of them for such a great day. 

You can view my line of stamps at http://www.treasuredtimesrubberstamps.com/products/our-stamps/hartman/ if you would like to purchase any of them.  I may be prejudiced but I think they are fantastic.  

Sunday, September 22, 2013

Home-made Acrylic Sprays


Last post we discussed the joys of using purchased sprays and I do love them!!!!  But…..I also love using the sprays that I make myself.  So easy and inexpensive to do, use your acrylic paint and an inexpensive spray bottle.  Seriously that is it!!!  I would not use your more expensive misters that you purchase, the acrylic paints will clog up the sprayer mechanism and it’s an easy fix but….. Why chance it?  I use spray bottles that I purchase at my local Walmart which have a body mist in them and are found in the travel size, they are perfect for this purpose and cheaper than purchasing a more expensive mister.  I emptied the body mist out of them, you can save that if you prefer, I don’t like body mist so I just dumped it out, rinse it out fairly well, add a small amount of paint to the misting bottle, add cold water to thin, shake to dilute the paint, and spray test on paper.  Adjust your amount of paint depending on the color intensity that you want.  You can use these just like any other spray but the beauty of these is that once they are applied and set up they are permanent.  Depending on your purpose that might be more desirable to you.  If your mister clogs up, remove the sprayer from the bottle and place it in a cup of hot water and spray the hot water through the mister until it works properly and then replace it in your paint bottle and continue spraying.  Just a minor inconvenience!  If you have acrylic inks you could also use those instead of paint, but be careful using your alcohol inks as a spray.  Alcohol inks and acrylic inks are a completely different formula and please check out safety concerns before you spray an alcohol ink solution.  Just sayin!!!  Do your homework to stay safe when painting.  You can also purchase the empty travel sized spray bottles but I found that the spray varied in each bottle so test them prior to using to make sure you are happy with the resulting spray application. 


I have a rather lengthy description of this process and how I used these sprays to make background papers for cards or scrapbooking under my blog archives of February – March of 2011. 


As many of you know who follow me on my blog I love stencils!!!  Love them and use them regularly in my design work.  So easy and such a popular trend right now.  There are so many wonderful stencils on the market from companies that are specializing in stencil designs to artists that have manufactured their own line of stencils.  Some of these names you are going to be familiar with while others might be new to you but I have tested stencils from each company and can personally vouch for their quality:  Laurie Speltz, Patty Rawlinson, The Crafters Workshop, Kaisercraft, Christy Tomlinson, Prima, Stencil Girl to name just a few.    http://stencilgirlproducts.com/  http://www.thecraftersworkshop.com/The_Crafters_Workshop/Home.html   Why not combine your inks with these amazing stencils to make spectacular journal pages or add them to a background on either a canvas or a decorative painting project?  Have fun and share the result.

 Also another plus is that my family doesn’t hassle me about my art hoarding when I am using materials that I already own.  WaaHoo!!! 

Sunday, September 15, 2013

Art Junkie? or Enthusiast?


I am a self-proclaimed art junkie, I admit it I love art supplies.  I love the colors, textures, and the potential; consequently to fuel my addiction I keep up with the trends.   Do any of you have this same dilemma?  My daughter even suggested, much to my dismay that my painting room was starting to resemble that of a hoarder.  Naturally (imagine my shock and annoyance) I suggested that I only needed a bigger space.  Do any of you have family members who would like to hold an intervention for you?  If so then we are in good company.  “Giggles and grins.” 


When I sat down to write this post the thought of that blank page staring at me was a little unnerving.   Those same feelings exist when I sit down to work on a journal page but being a can-do type of person thought to myself…. Then get rid of the white page!!!  Easy solution.  One new exciting trend in the art world is that of ink sprays, so cool and so many options to choose from.  The thought of quickly being able to get rid of that white scary space is liberating.  Being the art junkie that I am decided that I absolutely had to have a set of sprays!  But which ones to purchase?  Knowing that my husband and children would be calling an intervention specialist I decided that I needed to choose one brand and stick with it.  I started doing research and discovered this talented, crazy British woman by the name of Dyan Reaveley and her Dylusions line by Ranger.  She has a line of stencils, stamps, ink sprays, and a terrific series of You Tube videos for educational purposes.  That was right up my alley and I ordered the set.  Tried them out and loved them as well as loving her quirky nature and sense of style.  Check her out and see if you don’t just love her as well, I think that she would be a fun friend. 


Most sprays are water based which means that you need to do some planning if you don’t want to end up with muddy color applications; it also means that even when the sprays have set they may reactivate when you add subsequent layers.  Not a problem, just use a spray fixative in between your layers.  HMMMM!!!  Imagine the possibilities; this is the beauty and the frustration of spray application.   It also allows for the freedom to enjoy happy accidents occurring as you work.  Don’t like the random spray application?   Any of these sprays can also be painted with just like you would a watercolor.   I think that is brilliant! 


My next dilemma presented itself!  Dyan came out with new ink colors!  Oh No!  What to do?  Naturally I ordered them along with some of her stamps and stencils.  Oh well, my husband has been planning to build a storage shed out back, that should solve my current storage problem. 

Sunday, September 8, 2013

Gelli Printing on a Cold, Wet, Rainy, Day

Got up this morning to a cold rainy day and thought that it was a perfect opportunity to play with my new Gelli Plate.  I received the larger 10"X14" sized plate as a gift, already owned the 8"X10", and really hadn't had time to play much with it, got it out and had a really fun afternoon.  The size is great especially when I used my Catalyst Wedge tools, the size allowed for really using the wedge tools in a larger space which had frustrated me on my 8"X10".  I had wanted more space to wipe the paint off and get some fun results.  I also tried a number of techniques that I had learned when I took a Carolyn Dube online class. 

I used a number of different stencils, paint, Catalyst Wedge Tools and white cardstock.  I actually am going to make some cards using my new stamps and really wanted something totally different to use as background paper and couldn't seem to find anything that appealed to me out of my stock of Gelli Prints that I've done in the past.  I wanted something different than I had in my stockpiled scrapbooking papers as well and think that I have a couple papers which will do nicely. 

Here I used a combination of Catalyst Wedge Tools and a stencil to prep the Gelli Plate.  Have you tried the Wedge Tools?  Fun stuff!!!

Adding a variety of paint colors.  You do not need a large amount of paint to use the Gelli Plate depending on the technique that you want to use. 

Assorted stencils used on this print.  Sometimes they turn out like you hope and other times they get printed over.  It is a crap shoot for me usually.  I try to plan my prints but most of the time they are either happy or unhappy accidents. 

I like this one and then added my Dylusions Sprays to the background to jazz the print up a bit.  I may even add more stenciling to it eventually. 


These were my happy accidents.  LOL.  I like these and added Dylusions Sprays to the background of quite a few of these with the exception of the one in the very center.  Maybe these will show up eventually in another project.  HMMMM!!!!! 

Wednesday, September 4, 2013

Another Mixed Media Canvas Displaying the Jump for Joy Characters

The little mummy also blends in with the canvas and I'm not sure I like her on this canvas.  If I were to do this again I think that I'd change my background colors for this character. 

What do you think? 

Another Mixed Media Canvas Displaying the Jump for Joy Characters.


Frankie kind of blends in with the canvas and I like it.  I don't see that as a problem but if you had concerns you could easily change out your paint colors for the canvas. 

Can't wait to hear your thoughts!!!

Check back later on to see the third character displayed on this canvas. 

Another Mixed Media Canvas Displaying the Jump for Joy Characters

 
Here you can see the Jump for Joy Witchie added to the mixed media canvas and I think the combination of canvas and witch is darling.  I used Sticky Tack to add the wooden witch to the canvas and it works brilliantly, that way I can change out my characters as I please but I could easily have hot glued the wood piece to the canvas or even painted her right on the canvas. 
 
What would you do with these characters?  How would you display them?
 
Check back later this week to see two of the other characters added to this canvas. 

Monday, September 2, 2013

Another Mixed Media Canvas for the Jump for Joy Characters

I just can't seem to stop designing these fun canvases and then love adding the Jump for Joy Characters to see how they will look and I love them!!!!!!!!!!!!!  I'm seriously considering doing some smaller sized canvases for example a 4"X4" or a 3"X3" or even smaller and using my stamps from Jody Stacy at Treasured Time Rubber Stamping to stamp the image and then then paint them.  When Jody gets my Christmas stamps finished I think these will be darling as ornaments and the size is perfect.  Can't wait to try this!!!!

This canvas is a 6"X6" gallery wrapped canvas and I first started with neon Deco Art Americana Paints and a variety of scrapbooking papers that I decoupaged onto the canvas.  The scrapbooking papers that I used were left over from another project that I did and they seemed to work beautifully on this canvas.  Then I started layering stencils onto the canvas in a variety of random locations.  These were new stencils from Mary Beth Shaw at www.stencilgirlproducts.com and I loved them. 

Spider Web Stencil L081 This is one of the best spider web stencils I have ever used.  The quality is amazing and I would recommend it highly.  I'm sure you can look at the canvas and see where it was used.  One of the best things about stencils is the ability to place the stencil on the area and so see how it will look once the paint is applied.  I love that about stencils. 

 
This is another Stencil Girl stencil and I love how versatile this one is, so many different uses in this 9"X12" stencil.   This is the Eights Stencil L130.  I would recommend this company very highly to all of you who love stencils like I do. 
 

Here are the photos of the finished canvas and as you can see I also added another of my faves, Washi Tape.  Tomorrow I will start sharing the canvas with the Jump for Joy characters added to it so stay tuned. 
 
What do you think? 

Sunday, August 25, 2013

Tin Tooled Poinsettia Part 5


Use scissors to cut out each petal of the flower. 


Position the flower onto your surface and hot glue it to the canvas.  Cut out a piece of scrapbook paper for the center of each flower. 

This is obviously not the canvas background but instead a different background as I had already completed the canvas piece, this will give you the idea of how to position the petals to form the flower layering the smaller petals over the larger and hot gluing them into place. 


Enjoy!

Tin Tooled Poinsettia Part 4


After you have finished tin tooling it is time to add color.  I used alcohol inks to color this project using a variety of colors depending on the color variations that I wanted on the piece.  Experiment with a variety of brands and colors to find something that works for you.  Adirondack Blending Solution is an interesting product to use to achieve creative results in addition to your alcohol inks.  I dropped the Blending Solution onto my colored petals and it dispersed the color to add an interesting effect.  Use shades of red, orange, and yellow for the flower petals and shades of green for the leaves.  If you prefer you can always color the petals with colored permanent markers, I have found that over time the permanent markers may eventually fade depending on the amount of sunlight they are exposed to.  Colored tin is another option. 


Tin Tooled Poinsettia Part 3


Once you have achieved the deep ridges turn your tin over and refine on the front of the tin by pulling your stylus next to each line you drew working on a hard surface instead of on the soft mat.  This will allow each line drawn to pop out of the tin.  Refer to the techniques tutorial on my blog for detailed instructions. 


Tin Tooled Poinsettia Part 2


Tin Tool the Poinsettia:

Transfer the large and small Poinsettia petals; decide how many you will need to complete your flowers.  Use the attached line art.  Remember to transfer enough to use some as green leaves as well.  The smaller petals will be layered over the larger or can be used as a smaller flower.  Transferring is very easy, place the line drawing onto the tin and using your stylus draw over the lines working on a soft mat or a magazine.  This will transfer the design to the tin, go over the lines again to deepen the ridges on the tin.  Remember this side will actually become the back as this is a reverse embossing technique.  To allow the tin to stretch you will need to work on a soft mat or a magazine. 


Tin Tooled Poinsettia Part 1


Tin Tooled Poinsettia


This canvas is a follow up to previous tin tooling projects that I have shared with you and will allow you to use those techniques that you’ve been practicing but will encourage you to incorporate tin on a canvas surface.  This is meant to be a loose project where you can be very creative and use the media in a slightly different way.    This project will take a few posts to share the entire project with you, stay tuned. 

Supplies:
Tin of your choice, I used 36 gauge aluminum. 
Stylus, tracing paper, scissors
Canvas size of your choice, I used a 6”X12”
Assorted scrap booking papers. 
Alcohol ink colors of your choice
Assorted acrylic paint colors to be used on the canvas
Stencils
Rubons
Deco Art Decou-page
Hot Glue


I love mixing media and am thrilled with how creative you can be by using different media on a variety of different surfaces.  This project mixes tin, canvas, scrapbooking papers, and I even added Washi Tape to the stems. I opted to tin tool poinsettias that are added to a canvas that I painted and added a variety of fun stencils.  This canvas will be beautiful during the holiday season or would be a lovely gift for a friend.  In my opinion it is never too early to start thinking about Christmas gift giving. 
 
Paint the Canvas:
Choose any paint colors that you prefer, I used shades of blue, greens, and metallic gold that I blended together onto the canvas using a slip slap triple loaded brush technique and my fingers.  Use paint colors that work with your décor and eventual plans for this project.  I had just purchased a set of Dyan Reaveley’s Dylusions Stencils and chose to use them on this canvas with various shades of pink and white.  This type of painted background is very subtle and is meant to showcase whatever is placed in the foreground.  I then added Washi Tape onto the canvas for interest.   


I also added green Washi Tape onto the canvas to form the stems that you can see in the image at the beginning of the instructions, I like to decoupage Washi Tape onto the canvas to make sure that it doesn’t come off.  I also cut out a variety of leaves out of scrapbooking papers and decoupage them onto the canvas; you can use the attached line art as your leaf shapes as well as your flower petals.  I also had rubons that I added to the canvas as an interesting detail as well as adding veins on the leaves and some random written phrases using a permanent black marker. If you are going to use Rubons it is important to add a coat of decoupage over them so they stay put.  I love rubons and love how creative they look on a canvas.  This is your canvas and should be completed using materials that you have at home and are fond of. 


Monday, August 19, 2013

Mixed Media Halloween Part 3

Time to add the color!  Of course I couldn't just leave the white canvas and added shades of orange and yellow, as well as Glamour Dust Black Paint.  As I stated in my earlier posts I often paint using my fingers and like to be able to smooth the paint out onto the patterned papers, for whatever reason I feel like I have the control to blend the paint and smearing it precisely where I want it to be thinning it with water to achieve a random wash of paint.  You should feel free to use paintbrushes if you prefer, often people do not like to get paint on their hands but that isn't something that bothers me. 


Can't you just see the Jump for Joy Characters displayed on this as well????