I'm here in Las Vegas enjoying the Creative Painting show. The weather is fantastic, light jacket weather and lots of sun. It felt absolutely glorious, the wind was blowing today but even that felt good after leaving winter weather.
The show has been good, lots of new patterns at all of the booths. It seemed that most attendees were helping out the painting economy. Zentangled projects were all the rage and were found in a variety of surfaces and genre. Wooden keys are very popular and could be found at many of the booths from whimsical designs to prim and from a variety of artists. Hopefully this bodes well for my new key designs. People seemed to be enjoying them. Ornaments were also shown in large quantities as well as anything Halloween.
I spent time at a number of booths to watch a number of interesting demos, Loew Cornel had some very interesting new brushes that were new for this show, very unique and interesting brush shapes. I spent some time at the Loew Cornel booth watching Giselle Pope demonstrate the new brushes,very interesting. I was particularly interested in the glass etching demo from B and B Etchall, I use their products and can vouch for their quality. I was also interested in the use of stencils from Dreamweaver Stencils which I have used in my recent tin tooling blog posts. As many of you know I am a huge fan of using stencils and have blogged repeatedly about their use in painting projects. If you like metal stencils these are amazing.
I'm happy to report that my friends at the Ideal Wood Products Inc. seemed to be selling their amazing wood products as well as my patterns and the other artists that they carry. As soon as I get home I will post photos that I took of their booth and their amazing products.
Tomorrow I spend the day with Bobbie Takashima in a painting class.

Wednesday, February 27, 2013
Sunday, February 24, 2013
Poinsettia Mixed Media Canvas
Well it has been a crazy week, we are in the midst of a home remodel and managed to get the new counter tops and sinks back into the kitchen and bathrooms. We were without a kitchen and bathrooms for a few days but are back in business now. Needless to say I have not had any time to work on the Easter Jump for Joy canvases. I had hoped to have another blog post ready to go for you..... Oh Well. LOL. Life sometimes gets in the way.
I will be gone to Vegas for the Creative Painting Show this next week. WaaHoo!!!! I'm looking forward to nice weather and a week of fun in Vegas as well as attending the show. I will see how things go and may blog out anything that is new and noteworthy at the show, but if you don't hear from me you will know why. I'm going to be busy taking classes and playing. Fun!!!!
I did think that I would share a new mixed media canvas that I just finished that I think is gorgeous. I used a variety of surfaces on the background including stencils, Dylusions stencils to be exact, scrapbooking paper, Washi Tape, and some pretty cool rubons. The foreground Poinsettias are completed with Tooling Tin, I tooled each individual petal and then glued them onto the canvas to form the flowers. For those of you who enjoy working with metals this might be a good project for you to try. If you have been following my series on Tin Tooling I think you might enjoy seeing this piece. I think it is spectacular and wonder what you all think?
Have a great week and I will try to post at least one blog post during the show.

Monday, February 18, 2013
Jump for Joy Easter Canvas Part 3
Yesterday I managed to get the Jump for Joy Lamby character started and actually almost finished with the exception of the face and a few details. Easy Peasy!!!! Seriously, the body is stippled with the same brush and I didn't even clean my brush in between applications. It took me literally less than an hour to do the body, ears, hands, and feet. So simple! To finish this character all I would need to do if finish up the face and any other details that I chose to do. The other characters are also just as simple and require primarily stippling to complete the bodies. Keep an eye out for the other characters as I finish them up and post examples right here.
The instructions for this character are in the pattern on my website. Take a look at it. What other options do you think would be a good for this pattern for alternate surfaces? How about Easter Cards?

The instructions for this character are in the pattern on my website. Take a look at it. What other options do you think would be a good for this pattern for alternate surfaces? How about Easter Cards?

Sunday, February 17, 2013
Jump for Joy Easter Canvas Part 2
I've been having a great time working on these canvases and added additional detail to the eggs using my Faber Castel markers. They work great to add shading detail and the nice thing about them is they are an india ink product and are permanent shortly after you use them but can be wiped off or changed while they are still wet. Love them! I also used my white Faber Castel marker to add the highlight to the eggs. They are quick and easy to use and look beautiful. I also added the outline shapes of the characters and gessoed them in preparation of painting. I shaded behind the characters but may need to add additional shading and can do that once I paint each character. I'm loving these. What are your thoughts. Why don't you purchase the pattern and paint right along with me.


I'd love to hear your thoughts about these characters?
Saturday, February 16, 2013
Jump for Joy Canvas
I know that many of us try to use painting patterns in other ways and I began wondering how else could I use the Jump for Joy Easter Ornament pattern. The obvious ways were to use the ornaments on an Easter basket, or an Easter box, or perhaps a plate. Next I thought about something out of the box and my thought was to use the 1 1/2" wide Gallery Wrap canvas to make a mixed media project with these characters.
I painted the background of each canvas with Deco Art Americana Acrylics and began layering paint using a variety of stencils. You can see that I used many of my usual favorite stencils that I have discussed in other posts. The chevron, dots, but then wanted to incorporate two new stencils that I had just purchased and received in the mail earlier this week. I love these 6"X6" stencils from Crafters Workshop the Mini Stitch Doodle Dot and the Mini Pattern Strips. They work so well. I then decided to add some scrapbooking paper decoupaged onto the canvas in a variety of patterns and colors. The canvas seemed to still be missing something and brought out some of the new Washi Tapes that had also just come in the mail. I also added my Sew Easy Music Note stamp and loved the look of these.
I'm in the process of painting the characters onto the canvases and will post how they look as soon as I finish them up. What do you think? If you love these characters as much as I do come on over to C. Hartman Designs and purchase the pattern and come paint with me. I always love painting with my painting friends.


Thursday, February 14, 2013
Tin Tooled Owl Project Finished Option
Once I had
completed the piece I decided that I wanted to use the owl that I had enameled
on in a journal page and opted to cut out the various parts that I wanted to
use to put on the following journal page.
There are so many options for your tin tooled pieces. The sky is the limit.

Tin Tooled Owl Project Step 6 Coloring
·
I
also wanted to make sure that I showed you how to use embossing powders to add
color.
Emboss using your usual stamping embossing powders and materials in
exactly the same method for stamping. (note the earlier post).
Instead of using a stamp pad I used my Versamarker on the owl which
allowed me to get into the small detail areas.
This is completed using stamping techniques.


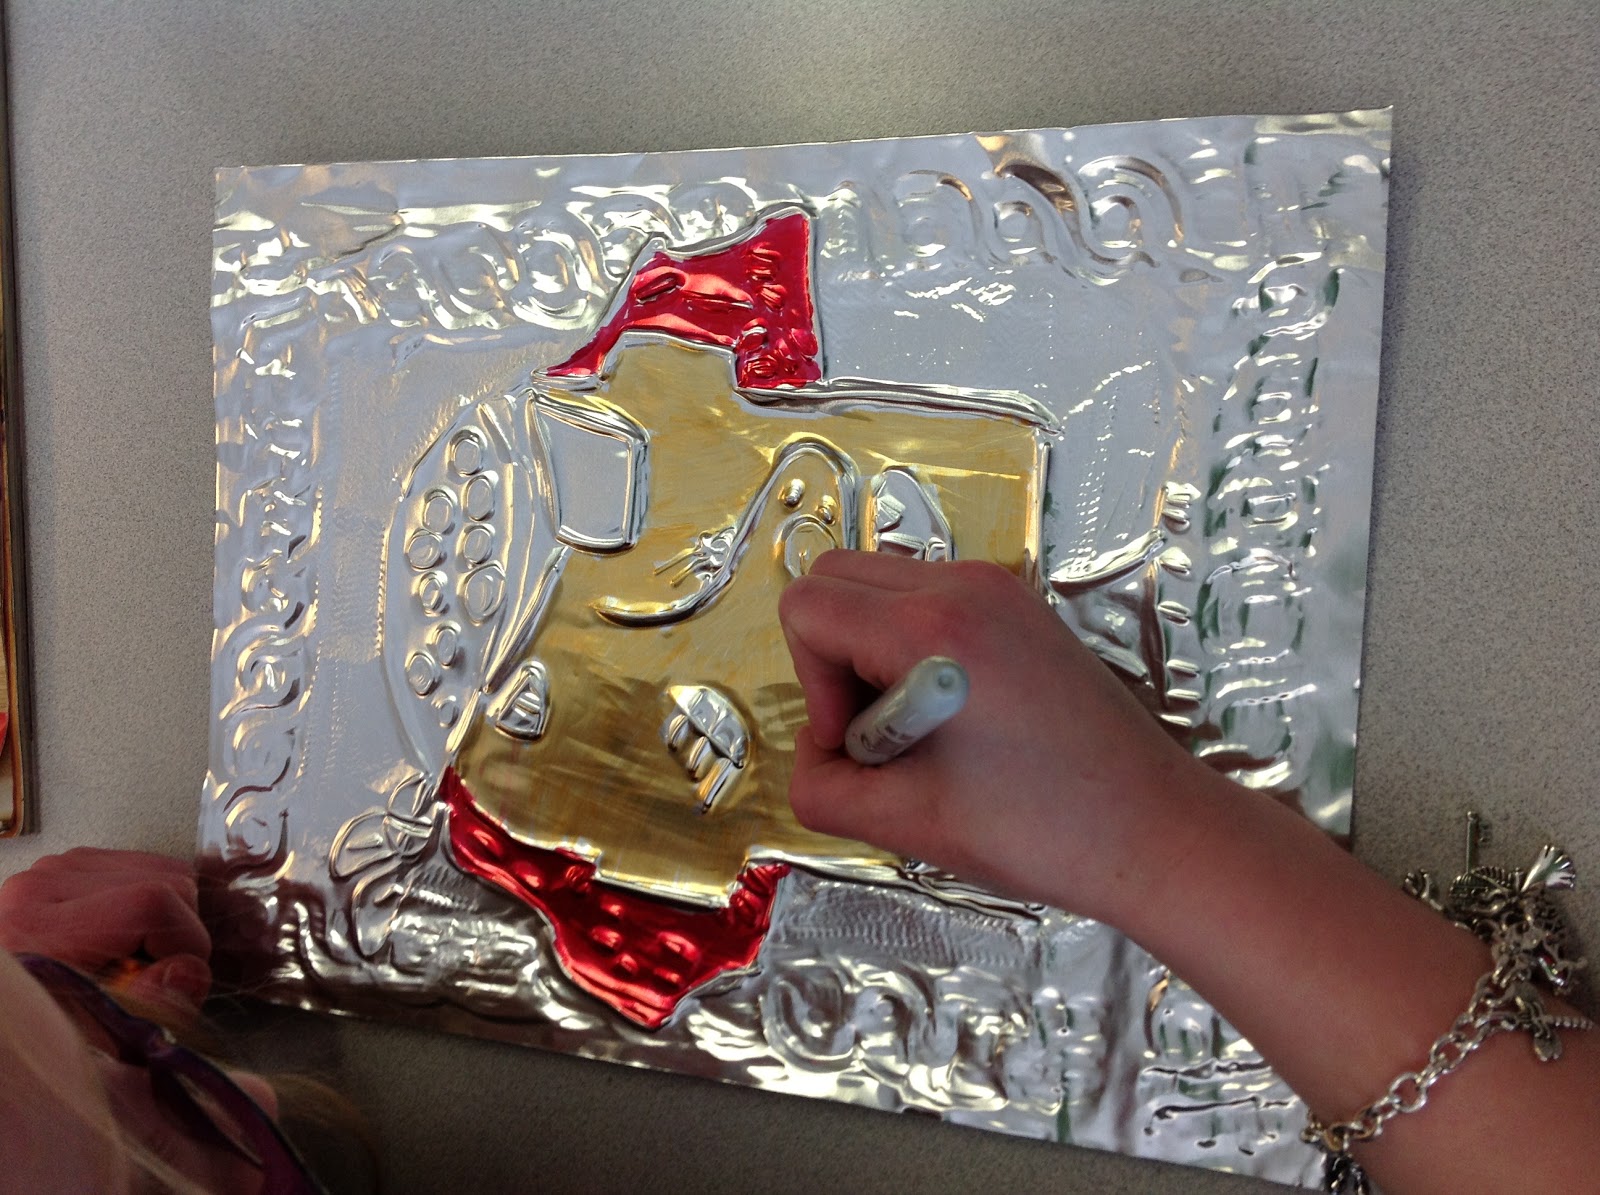
Maybe you don't want to emboss on your tin and instead would like to add color using permanent markers instead. A variety of markers work well on tin including any of the markers shown in the photo.
I use Sharpie markers because through trial
and error have found that I prefer the intensity of the color that is
produced. Any size and shape will work
depending on the size of your project. I
used the Ultra Fine Sharpies for the detail areas and the Fine tipped markers
for the larger areas.

Here is another option for finishing your tin project. I added texture to the background and colored the entire piece with Sharpie Markers.

As you can see
this finished piece is slightly different from the previous piece. This can be a
stand-alone piece or can be cut out and used in a different way.
Tin Tooled Owl Project Step 5
The following three photos show the process of embossing the areas that were transferred with the stencil, refined with the flat part of the stylus, and the owl once it has been refined.


You can see in this bottom photo where I transferred the stencil using a black permanent marker onto the back of the design.


Tin Tooled Owl Project Step 4

·
You
can add interesting detail to the outer edges of the design,
I’m showing you how to use a stencil but you could easily use a texture plate,
texture tools, or border tools. Place
the stencil onto the tin so that you either emboss or deboss depending on how
you want the design to present, I chose to place the stencil on the back and
using a blending staub worked my way around the sunflowers pressing and
stretching the tin (embossing) to show the 3-D effect. The stems were actually too small for me to
get my stylus into the space and I chose to use an ink pen to transfer the
lines to the back of the tin and then using my stylus pressed down to emboss
each line and leaf consequently transferring the design (embossed) onto the
front. You could choose to transfer the
design the opposite way (debossed) and that would be interesting as well but
could pose problems when trying to add the design to a flat surface. The stencil that I used is a metal Dreamweaver stencil but a plastic stencil would also work. If you choose to use a plastic stencil you may need to spend more time in the embossing process.


Tin Tooled Owl Project Step 3
·
Turn
the owl over so you are working on what is actually the front of the
design and work on a hard flat surface, you no longer want your tin to stretch. Using your stylus refine the
design by working with the pointed end of the stylus next to either side of the
ridge line that was formed in the previous step. There is no need to press as hard as you did
in the previous step but your goal is to allow the line to pop out and gently
press those flat areas of the design gently back down. Work your way around all of your ridge lines
on the design. You can also use the flat
end of your stylus and work your way around the outer edges of the design to
gently flatten the negative space outside the owl. You can easily use your finger for this
stage.

The blending staub may also be used to help refine the front of your piece.

Tin Tooled Owl Project Step 2

·
Pull
the design back from the tin and go over the lines pressing harder into the tin
stretching your tin to form a ridge on the reverse side making sure to work on the magazine soft mat. You are still working on the back of your tin
defining those lines that you just transferred.
This time you will actually apply enough pressure to form those ridges
on the front that will become the basis for your design. You may need to go over this a number of
times to develop a deep ridge. You can
press too hard and rip your tin, trial and error will give you the experience
to know how much pressure to apply.
Tin Tooled Owl Project Step 1
Christy
Hartman
All patterns and designs Copyright © belong to Christy Hartman. All rights reserved. These projects may be painted for personal
use/personal profit but may not be reproduced for graphic or scrapbook use for
resale. Photocopying and all other types
of mechanical reproduction are prohibited.
Patterns may not be republished, distributed, transmitted, displayed,
broadcast, or reproduced for any business/commercial purposes without written
permission from the artist.
Tin Tooled Owl
Project: Over the course of the next few posts you will see me complete a project using basic tin tooling techniques using embossing, debossing and refining. I chose to tin tool an owl but you may choose any design.
Supplies:
Tin (gauge of your choice, note the previous posts describing tin),
stylus, drawing blending staub, texture tools (optional), coloring materials of
your choice.
·
Tape
the design to the side of your tin that you want to be the back. Remember this
is a reverse embossing process and we will begin the design on what will become
the back. Using a stylus trace over the
design on the tin making sure to work on a magazine or your choice of
soft material that will allow your tin to stretch. The stylus will transfer the
design to the tin, this is not a painting technique and you will not need a
transfer material. Use enough pressure to transfer the design, similar to using
a pencil.

Tin Tooling Part 6
·
You can easily rubber stamp on tin but need to use
a stamping material that is permanent such as Staz On and then tin tool using
all of the techniques that I am going to show you in the project.


·
Stencils
are easy to use with tin. I completed
this sunflower tin piece using a metal stencil, my drawing blending staub, and
some of the texture tools. I colored it
with Sharpie markers. I used a Dreamweavers Stencil which is a metal stencil and was fantastic to use for this purpose.

·
Virtually
any design that you are would paint can be completed with tin. Any designer’s projects can be converted to a
tin project. It may be necessary to
simplify certain elements but once you get started you will soon find out what
you enjoy about the process and be able to make it your own.
Tuesday, February 12, 2013
Tin Tooling Part 5
Tin
is very sturdy and will hold up well on anything that is going to be for
decorative purposes however if you are planning to put this tin piece onto a
box for example you will want to add household spackle to the back to fill in
your design, then glue it to the piece and it will hold its shape with repeated
use otherwise the tin will eventually mash down.

Copper is a fun tin to work with and really requires little in the form of color, a really fun thing to do with copper is to heat it using a heating tool, I used my heat gun for embossing. Hold the copper with a pair of pliers as the copper will get hot and heat the copper shape and see the interesting colors that appear. This leaf card is one that I did using that technique. Liver of Sulpher is a chemical treatment that you can also use on copper but the copper has to be the real deal otherwise it won’t work. Sometimes copper tin is just colored copper you need the actual copper to make this work. A friend and I tried this once with mixed results

Tin Tooling Part 4
Another fun way to add color to your tin piece is
to use embossing powders just like you would if you were rubber stamping.


And then of course heat with your heat tool for embossing, giving you an enamel look to your tin piece.
Tin Tooling Part 3
This is actually a fairly easy art form, I’m hoping to give you the basics and then as
creative as you all are will allow you to spread your wings and fly, it is fun
and produces a unique product that many people do not know how to do as it is
becoming a bit of a lost art. Let’s
start with the tools that you will need:
·
You
will need a stylus, many people use a metal stylus and they work just fine, I use a
plastic one for no real reason other than it is what I’ve always used. My stylus
has a pointed end and a flat end, one side is for embossing while the other
side is for debossing or erasing. Yes
you can erase mistakes if you make them however be aware that you are
stretching the tin and you can only do so much stretching before you no longer
can return the tin to its original flat shape. I use the example of
stretching your clothing, if you keep stretching the fibers of your clothing it
eventually no longer returns to its original shape.
· Texture tools which will allow you to add interesting textures to your
piece. Dick Blick and the Ten Second
Company have a number of videos that you can watch on how to use some of these
tools. A flat brayer will roll over your
tin flattening the tin because it will tend to want to curve up as you
work. This roller should have a soft
feel to it otherwise it may flatten your texture although as I stated above your
fingers work just as well. This tool is
a miniature version of a printing brayer. Don’t confuse the two.
·
Border
pieces work as a rubbing plate and then as you refine your design add
interesting texture. These work best
when used with a blending staub for drawing to transfer the design and then to
softly add the detail. The border tools
that I have are from the Ten Second Studio but there are a number of good tools
out on the market. My third grade
students used both the texture tools and the border pieces on these pirates.

You can see a knight that another student is busy designing that will be completed using tin.
Tin Tooling Part 2
These are samples of tin tooling texture tools that are available from the company Ten Second Studio although many different companies produce these. You can also see some of the textures that are produced by each tool. The tool on the right is a soft mini brayer that can be used to smooth the tin out because texturing tends to curl your tin. If you don’t own one of these your fingers will do the same thing and often I prefer to use my fingers.

The border pieces that you see here are made by a company called Ten Second Studio but many of you have background and border plates in your kit. You use these very similar to a rubbing plate or a texture rubbing. Rub a blending staub, used for blending graphite and charcoal, over the plate to reveal the border pattern and enhance by running your blending staub throughout the design.

Tin Tooling Part 1
I recently was asked to develop a project and informational talk on one of my online groups about Tin Tooling or Repousse. I thought that it might be something that many of you would also be interested in. Have you ever tried tin tooling? The
techniques are very simple to learn, there are just a few basic techniques for
embossing or debossing(chasing) your tin.
Embossing means to develop a raised edge on your tin and this is
actually a reverse embossing process as you begin working from the back of your
tin and finish on the front. Debossing, (chasing or to sink
the metal on the front) is
the process of flattening the areas surrounding the embossed ridges so that the
embossed ridges “pop” out. After we have
discussed some of the general techniques we will explore those techniques in
more depth.
While repoussé is used to work on the reverse of the metal to form a raised design on the front, chasing is used to refine the design on the front of the work by sinking the metal. The term chasing is derived from the noun "chase", which refers to a groove, furrow, channel or indentation. The adjectival form is "chased work".
The techniques of repoussé and chasing utilize the plasticity of metal, forming shapes by degrees. There is no loss of metal in the process, as it is stretched locally and the surface remains continuous. This is from the Wikipedia definition of Repousse or Tin Tooling.
Historically craftsmen used the art form to produce a variety of decorative functional pieces from serving dishes to jewelry and is still produced by a number of talented craftspeople around the world. We can use the techniques that were employed on a smaller scale to add interesting detail to cards, mixed media pieces, and decorative pieces of art work. Your goal in the process is to stretch your tin so that you achieve the raised edges on the front (emboss) making sure that you work on a soft surface which will allow that tin to stretch. You can use a magazine, pile of newspapers, piece of foam or anything that will allow your tin the ability to be elastic. It isn’t necessary to invest in tools to be able to tin tool, you will need a stylus and tin that is soft enough to be able to emboss. We use a stylus to transfer the design; the stylus can be either metal or plastic depending on your preference, making sure to always work on a soft surface. The stylus is held upright at a 90 degree angle which will allow the full impact of the point to achieve that deep ridge while you apply pressure to the stylus.
Tooling tin comes in a variety of thicknesses (gauge) and depending on what you want to do with it will determine the thickness that you want to use. I generally use a 32-40 gauge tin and find that is a good thickness for either 3-dimensional projects or flat projects, the higher the number the softer the metal. This thickness of tin can easily be cut using a pair of scissors or a paper cutter. There are a number of tools that you can purchase including a variety of texture tools which accomplish a number of different textures including wheeled tools or texture plates. Many household items will also give you an interesting texture on your tin, use your imagination, I often use my Cuttlebug plates to achieve interesting textures and if your tin is soft enough can run the tin through your embossing and die cutting machines. You just need to experiment with this.


You can see above that I have used a Spellbinders die to emboss with and below my Cuttlebug embossing Folders as well.
Sunday, February 10, 2013
Easter Tea Light Pattern
The second pattern that I have just finished and put on my website is the third in the series of Tea Light Patterns, the other two can be found on my website www.chartmandesigns.com This is the long awaited Easter Tea Light and is painted on the wood blanks which can be found on my website and are laser cut. I love a laser cut piece as they require very little prep work. These characters might look familiar as I made this a companion piece to the Easter Jump for Joy characters of Peter and Ducky. This is a bright and very cheerful piece and I hope you enjoy painting it as much as I did.


Jump for Joy Collection
It has been crazy around my house lately. We are in the process of a remodel in our house and it is a work in progress for sure, we are soon going to be without a kitchen and are hoping that is short lived. Needless to say I've had to curtail some of my painting/blogging activity because there just isn't enough hours in the day or free space in my house. LOL. But we are going to be thrilled with the result so it will all be worth it.
Needless to say I have managed to get two new patterns ready to go and they are part of the Jump for Joy collection. I really love this collection and honestly it is a first for me because I have never done a pattern collection before. This has been a work in progress for a while as I had to find someone who was able to cut the ornaments for me as I wanted them cut using a laser and I am so thrilled with the result and my collaboration with Bob Perrier in Canada from Wood Things http:woodthings.ca I am actually carrying the wood blanks for the ornaments and the keys can be purchased from Bob. The pattern can be found on my website www.chartmandesigns.com
Look for more in the collection to come, probably after our home remodel. LOL. I hope you will enjoy these as much as I did designing and painting them.


Subscribe to:
Posts (Atom)