
Monday, January 3, 2011
Creativity and House Elves
I'm posting a link to a talk by Elizabeth Gilbert that is fascinating. http://www.ted.com/talks/lang/eng/elizabeth_gilbert_on_genius.html For those of you who aren't familiar with her she wrote the book Eat, Pray Love and talks about the worry that many of us face that we may have already peaked in our artistic lives and may not have another creative thought that is worth sharing with the world. She also delves into the idea of "Where Creativity Comes From"? I have certainly been asked on many an occasion where did my inspiration come from and rarely do I have an answer, sometimes in the shower. LOL. Sometimes in the middle of the night and can be fleeting and if I don't write the idea down immediately can be gone forever. That is certainly frustrating. Elizabeth thinks that we have little elves similar to the house elves in Harry Potter who are responsible for our creativity and if something fails then it it their fault. That is a fairly simplified version of her conversation but a part that appealed to me. So if a pattern or a project fails to sell well it may not be my fault and instead is my creativity elves fault. That certainly takes the pressure off of me to be "creative" all the time. LOL. I thought that her talk was entertaining and wonderfully insightful and can see why she is on the best seller list as well as having Julia Roberts portray her. It could certainly bring about an interesting discussion. I don't see Julia Roberts jumping up to portray my creative life. I wonder why not? LOL.

Tuesday, December 21, 2010
Another Great Santa

Wednesday, December 15, 2010
Santa Card

Completed Santa
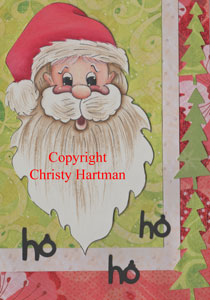

I'm not sure what the next series of blog posts will be about but check back often to see what I do in the New Year.
Sunday, December 5, 2010
Santa Face 2nd in the Series

Instructions for painting Santa's Face:
1. Base the face with Deco Art Americana Hi-Lite Flesh, float shade with Shading Flesh, highlight with Light Buttermilk. Base the pupil of the eye with Lamp Black, dip dot with Snow White and float a light highlight float onto the eye. Float the cheek with Spice Pink and deepen the float over the mustache with Antique Maroon. Base the inside of the mouth with Antique Maroon. Dip dot the cheek with Snow White.
2. Base the hat with Santa Red, float shade with Napa Red, highlight with Light Buttermilk.
3. Using a rake brush thin Asphaltum down and wash it into the beard and hat trim areas and then float shade Asphaltum under the hat brim, around the face and under the mustache.
4. Using a SL line the hair on Santa's forehead with Snow White.
If you are painting along with me I'd love to see the result.

Monday, November 29, 2010
What Else Can I Do With this Santa Pattern? Santa Card Step by Step

Sunday, November 28, 2010
What Else Can I Do With this Santa Pattern?

My thoughts are now on getting ready to decorate for Christmas, the tree needs to be put up and the house transformed. I started thinking about my patterns and thought which patterns could be adapted, I have numerous Christmas patterns that could easily be adapted to different surfaces but this Santa pattern appears to be the most difficult because of looking like it is so surface specific. With a little creativity you could definitely adapt this to different surfaces and with my next few posts look for me to offer you ideas how to adapt one of these Santa's to be used on a card. It can be done with just a few minor changes. I'm going to do a simple step by step project that you can use to make your own Christmas cards and who knows I may even use the Cricut to add some interesting detail.
Take a look at this project and think about the other options for surfaces for it. As I stated above cards are an obvious choice but what about candlesticks. Why not use this pattern to make beautiful candlesticks for your holiday table? How about putting one of the Santa faces on the center of a plate to serve cookies or homemade goodies on and give the plate and goodies to your friends as a gift. There are numerous great small wooden or tin plates that can be used that are relatively inexpensive and anyone would be delighted to receive a wonderful gift like that. How about using one of those fantastic battery operated candles to adapt the pattern to. I think that one of the round candles would be a fantastic small chunky Santa.
Anyone out there have any other ideas? Look for my next post starting the step by step Santa adapted to a card.
Tuesday, November 23, 2010
What Else Can I Do With This Love Bug Boogie Pattern?

That being the case, what might possibly be some ideas for other uses for this pattern since I am obviously wishing for nice weather? Lets think about the obvious ones to start with, cards always come to mind and you can view the free pattern that I did as a companion to this pattern on this blog the "Night Light Bug". Since completing that free project I've purchased a Cricut Die Cut Machine and could certainly use many of the different cartridges to add to and enhance this design. You could add borders, change the painted lettering to one using the Cricut fonts, and enhance the background. How about finding an interesting poem to use on the inside of the card, print it out on your computer, use a great scrapbooking paper as a background thus personalizing the card for someone special. Of course you could do the same thing for any of the bugs that are on this pattern and make an interesting card design to showcase the individual bugs either on the clips or on the candle holder design. How about making a long thin card where the bugs flow down the front of the card similiar to the clips on the pattern. Keeping that theme going why not cut out tags on the Cricut and paint the bugs onto the tags and add them to your Christmas packages? Wouldn't your friends and family think that was fun and just a little quirky??? Imagine the fun they will have when they open their packages Christmas morning?
If you look carefully at the candleholder design you will see that it tells a story of a bug's night out dancing in the moonlight. Why not use that idea to paint a series of paintings as a storyboard on watercolor paper or cardstock, mount them either individually or as a series using matte board and an interesting frame. This would be darling in a child's room or as a seasonal accent in your home. Years ago when I first became interested in decorative painting it was all the rage to cut out individual pieces and hang them on your walls as plaques. Wouldn't these bugs look darling cut out as individual pieces to hang as accent pieces for the storyboard idea that I mentioned above? Here's another thought paint the bugs onto the edges of the picture matte board to enhance the storyboard! That would continue the design on out to the outer edges of the piece. Some of my favorite pictures that I've hung in my home are those where the painting incorporates the matte extending the painted surface.
Have you been listening to the news media and the concern over the body scans that airport security is using? I'm not going to expound on the whole issue of body privacy in this blog but it certainly made me start thinking about my travel concerns for 2011 and one is certainly how to recognize my luggage. Why not paint a luggage tag with bugs on it to help identify your luggage?
How about painting a fun pin to wear with one or more bugs on it? I love to wear pins especially my vintage pins that are family heirlooms. As a teacher my students look at my jewelry and comment on it and a bug pin would be a fun addition to my spring clothing wardrobe. Ok, now I know that I've gone over the deep end if I am thinking about wearing cooler clothing when I decided to take a space heater with me in the morning because my classroom was so chilly yesterday. I'll leave you with those ideas to mull over while we weather through the remainder of winter and think thoughts of snowmen and winter driving. Like me it will give you something to think about instead of cold winter weather and concerns about driving, shoveling snow, and cold weather. Have a wonderful winter season while you dream of nice weather to come.

Monday, November 22, 2010
Important change to the website!
I have made some changes to the Pattern Categories on my website that you will need to know to purchase your favorite patterns. If the pattern is only available as an E-Pattern it is still under the E-Pattern Category. However if the pattern is also available as a Paper Pattern Packet, that you will receive through the mail, the patterns are organized according to the pattern theme in the Menu. To find the patterns that are available as both E-Patterns and Pattern Packets you will need to look through each pattern category. I have placed a drop down menu to purchase either pattern type under the pattern description. Simply click on either the Paper Pattern or E-Pattern and the red cart button and the pattern will be added to your shopping cart with the accurate price. I hope that this makes your shopping experience simple.
Saturday, November 13, 2010
What Else Can I Do With this Wildflower Pattern?

I began to wonder what else could I do with this project to make it more versatile, which we all know that painters and crafters are so good at doing. My daughter, who loves hiking and camping in the back country, wanted a photo album painted with wild flowers for her birthday. I used the flowers in this piece as the border and painted a young lady with her backpack holding a map as the centerpiece. It was truly lovely and unfortunately didn't have a chance to get a photo of it prior to giving it to her. I just used a larger sized album that I purchased from Creative Memories, I think that it was 12"X15", and this size gave me a nice sized canvas area to paint on. Now my daughter can save all of her backpacking memories in this album.
I also thought that maybe it would be nice to have summer even in the cold winter months and painted these flowers on glass ornaments to give for Christmas gifts. I personally love nontraditional ornaments on my tree and thought that these were a great idea. I sat down one afternoon and within 2 hours had painted 2 dozen ornaments. I've also painted these on my old standby of cards that I've given to friends on their birthdays.
So often we look at a design and are put off by it because we don't own the brush that the artist used to paint it. I used two of the Dynasty Butterfly brushes to paint these but have found that you can easily substitute the Dagger brush to paint the Scarlet Paintbrush with outstanding results and a small flat brush to paint the Lupine. I've painted both of these flowers with a variety of brushes and had a great deal of success in fact I used a 1/8" Lettering brush to paint the Lupine recently and loved the result.
When I was demonstrating this project at the Hoot Show in Ohio this year I had a number of ladies mention that "of course I could do these wildflowers I designed them" which made me laugh because they are truly so simple to do if you follow my instructions and look at the color worksheet which I am posting for your information here.
Let me know your thoughts on this project? Does it scare you off because you feel it is too scary or do you feel comfortable giving it a try?

Friday, November 12, 2010
What Else Can I do with this Tooth Fairy Pillow Pattern?
How many of you paint or craft with children in mind? I know that I certainly do. I painted for my children when they were small and painted gifts for nieces, nephews, and eventually my children's friends. I have a number of projects that were designed specifically for children and one of my favorites is the pattern "Even Monster's love the Tooth Fairy". I think that it is darling as a tooth fairy pillow but can't you just picture it as a card or a wood cutout for some adorable child.


This project was inspired by one of my own children's favorite books Where the Wild Things Are by Maurice Sendak. I can't tell you how many times I've ready that book over the years and it remains one of my favorites to read aloud even now. In fact I just read it last month to my kindergarten classes. Both I and children alike love a good monster story and if you've been a follower you know that this is a project that I've done over the years with some of my students.
As I was thinking about what else could be done with this pattern I immediately thought about cards, but why not think in terms of enlarging the monsters faces, cut them out of 1/2" pieces of pine and hanging them in a nursery or a toddler's room. How about painting them on a larger pillow or in the center of a quilt for a lovely bedding set? How about on a glass block to use as a child's nightlight?
I think that the possibilities are endless and would love to hear your ideas. I hope that many of you will take the plunge and share your ideas.
Sunday, November 7, 2010
What Else Can I do with that Pattern? Second in the series.
 With the economy the way that it is I don't know about all of you but I certainly want to be able to find creative ways to use the things that I already have. I think that the word that I am looking for is repurposing. Not a particularly good post when I am in the business of selling new patterns. In spite of that thought thriftiness is exactly what prompted this set of blog posts. I've been taking a look at many of the patterns that I've designed and thought what else could my customers do with that pattern that would be fun and creative. Cards are one thing that comes readily to mind. Don't we all love to get handmade cards in the mail. I know that for me handmade cards are the ones that touch my heart and tend to get saved and pinned up onto my bulletin board or hung up on that popular repostitory of all things important in my life, the refrigerator. If I can't find something that I "thought" that I had filed I look up on the refrigerator. LOL. Often I find it there. Sad but true.
 I like to send cards to friends when they are having a rough week for one reason or another and find that a cute card brightens up their day. I've recently had a number of friends and family who have fought a battle with cancer and later each one of them reminded me of how much it brightened a rough patch when they received a card in the mail. A handmade card that I had made for a friend in a similiar situation brought her to tears, not exactly my plan, but it certainly showed me how much any handmade item touches the hearts of those we love.
Keeping that in mind I took a look at the patterns on my website and thought which ones might be fun to redesign into cards. Since I've been thinking about friends who have been having challenges in their lives I immediately thought of the pattern "Hear no Evil, See no Evil, Speak no Evil" under the Miscellaneous Pattern Category. Since friends have been on my mind I thought what a perfect pattern to develop as a card because it already shows three friends out on a night on the town having a great time. A little bread, a little cheese, some yummy wine and good friends, what more could we want? There would be minimal work to adapt it to a card surface painted on watercolor paper and layered over a lovely scrapbooking paper would be fantastic.
How about ideas from all of you?
Sunday, October 31, 2010
What Else can I do with this Project?


How many times have you purchased a pattern or a book and painted every project on a different surface than the artist did? Probably a lot would be the answer, we as painters and crafters are a terribly creative group otherwise we wouldn't be interested in this hobby. In this economy we have to be very frugal and if we are going to purchase a pattern or a book we want to make sure that we get the most out of our money. I'm no different, as I complete any project I often like to come up with another use for the project for myself and for all of you who purchase my patterns. If you look at the pattern "Falling Leaves" under the Fall Pattern Sub-Category you will see that for the money you get three different projects that you can complete: 3 Fall Cards, the Fall Lazy Susan, and the battery operated Ornament Candleholders. The cards would be lovely to take in conjunction with a bottle of wine as a hostess gift, the ornaments can either be placed on a tree for the fall/winter holidays or can be used as battery operated candleholders, and the lazy susan could be switched out with charger plates or candle plates. How about instead of plates you use the pattern to design a table cloth or a table runner. I think that these leaves would be gorgeous painted around the edge of a table cloth and used for Thanksgiving dinner with a beautiful centerpiece. I love fall and love the look of fall leaves but keeping them intact is often a challenge why not paint them and enjoy the look without the dust that so many of us are allergic to.
Often when I design a project I like to come up with an alternative to the surface that I've used and in the next few blog posts I'll use my creativity to come up with new surface ideas for my patterns. Post your ideas as well and lets see if we can get a running dialogue going.
Saturday, October 30, 2010
Loss of Painting Magazines
It has been a sad day in the painting industry to hear of yet again another painting magazine being eliminated. I was in the process of developing two new projects that the editor and I were discussing, this morning I received an email answering an inquiry that I had sent concerning one project and then this evening finding out that the company had chosen to eliminate this magazine as well as their other craft magazines. After receiving this email that I know many of you also received I could hear the sadness and shock that the editor must have felt. I know that this was probably an economy based decision but it makes me feel so sad for the jobs that were lost due to this decision as well as the loss for the artists/designers that developed such lovely designs for the industry.
We as painters need to band together to keep the industry alive and we can do that by communicating with each other on the painting forums, frequenting the blogs that we enjoy, and communicating with the editors and owners of the magazine companies not only our complaints about the magazine issues but also what we like and appreciate about the job that they are doing. I know many of you already interact with online painting groups, I personally belong to a number of them and post as often as my schedule allows.
I've heard talk that online magazines may be the wave of the future with subscribers downloading their magazines to home computers or personal devices. Currently I receive an educational magazine in a digital copy and must say that I miss the smell and feel of holding the magazine in my hands. To keep this from happening we need to speak up and help the industry by being proactive to keep an artform that we love alive.
On the front page of my website I've suggested that you leave comments and interact with the blogs that you enjoy, I know that I would like to have that type of feedback to provide my customers with the best quality service that I can.
We as painters need to band together to keep the industry alive and we can do that by communicating with each other on the painting forums, frequenting the blogs that we enjoy, and communicating with the editors and owners of the magazine companies not only our complaints about the magazine issues but also what we like and appreciate about the job that they are doing. I know many of you already interact with online painting groups, I personally belong to a number of them and post as often as my schedule allows.
I've heard talk that online magazines may be the wave of the future with subscribers downloading their magazines to home computers or personal devices. Currently I receive an educational magazine in a digital copy and must say that I miss the smell and feel of holding the magazine in my hands. To keep this from happening we need to speak up and help the industry by being proactive to keep an artform that we love alive.
On the front page of my website I've suggested that you leave comments and interact with the blogs that you enjoy, I know that I would like to have that type of feedback to provide my customers with the best quality service that I can.
Friday, October 29, 2010
JB Weld Kwik Wood Ornament Pattern Available
I finally finished the ornament patterns and have them available on my website, all four pattern photos are currently on the website. You can purchase the patterns as E-Patterns to make as Christmas gifts for friends or for your craft shows. Kwik Wood is so easy to use and made quick work of the sculpting process. I owned a set of sculpting tools because I have been interested in sculpting for some time now but if you do not have the tools there is no need to invest in a set as you can use household items and even can make a few of your own. I give you sculpting instructions, illustration templates, hints and tips for making your own sculpting tools or household items to use in each of the patterns as well as numerous photos for reference. I purchased my first tube of Kwik Wood at Home Depot but later found it at a local hardware store. If you like these patterns please leave comments so I can get the feedback on this set for future reference.
Saturday, October 9, 2010
JB Weld Kwik Wood Ornaments

My last post mentioned that I was using JB Weld Kwik Wood to sculpt with, adding it to wooden shapes to develop something new and different. I really love the process as well as the product. It paints up beautifully and even though you have a fairly small window to work with it is relatively easy to use. Here is one example of an ornament that I made using it. This pattern is soon to be released on my website for purchase. I hope that you like this.
Tuesday, September 21, 2010
Kwik Wood
Have you tried working with JB Weld Kwik Wood. I've been working on ornaments with it that I am sculpting and then attaching to some wooden ornaments by Cupboard Distributing. I'm planning to have the pattern ready to go prior to the Christmas painting season. It is amazing and so versatile. It is an epoxy putty that you knead with your fingers prior to using then just sculpt away and you literally just set it on the wood piece and it adheres within seconds. It eliminates the need for any type of adhesive. I've finished two so far and am working on three more for this set and then have plans for four more to add to the set. I can't wait to share these as they are soooo much fun to do. Hopefully I will be able to get them finished up and on my website soon. I'll keep you posted.
Monday, September 13, 2010
30 % Off Stock Up Brush Sale
All the paint brushes on my website www.chartmandesigns.com are currently on sale for 30% off the retail prices. Are you someone who likes to start Christmas shopping early? I am and I know that I love a good sale. What could be better for that special painter in your life than a brush and pattern combination.
Saturday, July 24, 2010
Creativity Research
There seems to be information all over the news and internet about creativity and the lack of it in our young people. I recently read a Newsweek article on this very subject. Researchers blamed the current video game craze as one factor and that may be part of the problem however as a teacher and veteran educator my thoughts are that another factor is the insistence of the government and society to see our test scores raised continually higher and higher and basing school funding on those test scores. I don’t think that this is necessarily a bad thing but when it inhibits the amount of time that classroom teachers have to spend encouraging and planning creative thinking activities then it becomes a problem. Teachers are under a huge amount of pressure to continually raise test scores often to the detriment of something else. Due to this continued pressure teachers spend additional time drilling and practicing basic skills as well as test taking strategies in addition to dealing with added curriculum, behavior and social issues. Naturally something has to give and that is often creative activities. We’ve always been a nation of creative thinkers, that is how our nation became such a force to be reckoned with and I hate to see the creative process removed from the curriculum. I’ve always been fascinated with creativity and how it impacts our lives and learning and have spent my career being heavily involved with promoting creative thinking and creative activities for children in both the art room, classroom, and promoting higher level thinking skills for gifted and talented children. I like to stay on top of the current reserch that is being put out on the brain and creativivity and recently read a study done by John's Hopkins on brain research and the need for creative activities and how these stimulate areas of the brain. It is fascinating reading and I'd encourage any of you who are interested to take a look at the research coming out, not only does it have implications for the educational community but also for the artistic community. The research is suggesting that creativity can be inheriant to the individual but also can be a learned process through artistic and creative activities which suggests that we can learn to draw, paint, sculpt at any age. Think about it.
Friday, July 16, 2010
Free Demonstration at HOOT

I will be giving a free demonstration at the Dove/FM Dynasty Booth at HOOT on Wednesday evening August 11. For those of you who aren't familiar with the show it is in Ohio and is a wonderful opportunity to regenerate and reinvigorate yourself as an artist and painter. I'm planning to demo the use of the new Butterfly Brush that I used on the Scarlet Paintbrush article in August Quick and Easy. You can see a sample of the project that I will be demonstrating here. Stop by and see me if you are going to be in the area.
Subscribe to:
Posts (Atom)