Tuesday, March 22, 2011

Another Background

How about using tissue paper to form an interesting textured background for your cards, collages, or scrapbooking pages.  I adhered the tissue with Deco Art's Dura Clear Gloss Varnish by brushing the varnish over the paper, ripped pieces of white and yellow tissue paper and placed it on the cardstock brushing over the top with additional varnish and continued until I had covered the paper.  While the paper was still wet sprayed the same transparent Deco Art paint colors over the tissue paper that I used in the previous post.   It was quick and easy to do and is fairly interesting.  I'm planning to try something slightly different within the next few days.  I'm not sure exactly what I will do with this but think that it will make a great background for a card.  I need to play with it a bit more to find my favorite combination of materials and paint application.  It is pretty bold and the gloss in the varnish didn't scan as well as I had hoped but we'll see what happens when I try something slightly different. 

Any ideas for how to use it????

Thursday, March 17, 2011

Background Papers

Do you like to do a variety of paper crafts? Many of us like to use premade background papers. What if you could use the materials that you currently have and make your own? I decided to try my hand at making my own background papers. I wanted these to have a soft subtle appearance similar to what an airbrush would achieve however I didn’t own an airbrush. After some trial and error I found that small travel sized spray bottles worked really well and were certainly more economical. I found that the Deco Art transparent colors worked very well; Americana Bright Yellow, Viridian Green, and Primary Blue gave me a nice mix. I then added Glamour Dust Paint to the papers to give them that soft shimmer.


• To mix the paints I added a small puddle of paint to the bottom of each spray bottle and began adding water, testing on a separate piece of paper until I was happy with the resulting paint color.

• Next I wet a 12”X12” piece of white cardstock with clean water that I had beside me in a spray bottle.

• Next I sprayed Bright Yellow onto the wet piece of cardstock. It may be necessary to spray clean water over your yellow paint to get it to move around on the paper.

• I layered Viridian Green over the Bright Yellow, again spraying the mix with clean water to encourage the paint to mix and blend naturally. You will find that some puddles appear depending on the amount of water that you have used, move your cardstock around to encourage the paint to mix and blend always allowing each previous color to show.

• Layer Primary Blue over the green and yellow layers. Apply as much or as little as you prefer. If you find that too many puddles are still on the paper you can gently absorb some of the paint with a paper towel. Dry with a hairdryer.

• Paint Glamour Dust Lemon Drop randomly over the yellow areas, Glamour Dust Limelight over the green, and Glamour Dust Sapphire Blue over the blue areas.

• Allow these to dry completely and iron out the wrinkles making sure to protect your iron with a soft cloth.


Are you interested in using other paint colors, look for the transparent Deco Art Paint colors and experiment with making your own color combinations. These make beautiful background papers for cards, stamping, and altered art. If you are interested in seeing other paint combinations and other techniques visit my website and blog.


Sunday, February 27, 2011

Trifecta Brush Designs

In an earlier post I had promised that when the Paintworks online project came out I would let you all know and it finally came out online at http://www.paintworksmag.com/projects/index.shtml and the project photographed beautifully.  I know that the editors chose to have this photograph be a Christmas themed project which is an interesting take on it but you can see that it wasn't designed with a holiday theme.  This photo is mine not the photo from the article and this isn't as good but you can see the project easily.  I used the Trifecta Brushes to paint the Plumeria and the Hibiscus flowers on the candles. 

I'm also posting another photo of a sunflower that I painted using the Trifecta Brush and painted the petals of the flower by pulling the brush on the side of the bristles but double loaded the brush to shade and highlight at the same time.   I used the smallest brush in the set to add the shaded detail on the center of each petal.  The center of the flower is painted using a stipple brush and I carry that 1/4" Deerfoot Brush on my website as well.  The Dynasty Deerfoot brush is quite possibly the best on the market and is an excellent price for the quality.  Why not pick up the set of Trifecta Brushes and throw in a few extra brushes to round out your order. 

Monday, February 14, 2011

Simulated Airbrush Background Papers for Cardmaking and Scrapbooking

Have you received your Deco Art Newsletter?  I am featured under the Helping Hands section showing how I have painted background papers that I've used in card making and scrapbook pages then added a splash of glitter using the Glamour Dust Glitter Paints.  It was fun to do and I'm thrilled that Deco Art liked the process and was interested in adding it to their newsletter.  This is a very fun way to use what you have at home to paint papers and is very inexpensive.  I used travel sized spray bottles and a very limited palette to paint cardstock.  The photo that I am sharing with you today simulates the look of batik and all I used were flowers that I had cut out of vellum on the Cricut and layered my paint to form this lovely paper.  How fun is that?  My next post will show another background paper but with a slightly different palette and technique.  Don't receive the Deco Art Newsletter?  Go to http://www.decoart.com/ to sign up today.  You won't be disappointed. 

Sunday, February 13, 2011

FM Dynasty Trifecta Brush

What an amazing brush!!!  I can't tell you how much I love this brush.  I originally received a prototype set when Dynasty was developing this new brush and I immediately fell in love, in fact I was after the folks at FM Dynasty to hurry up and get it released to the public because I wanted to be able to share it with all of you.  The learning curve with this brush was not steep at all and I found myself using it in so many different applications, this is going to be one of those brushes that I use on a regular basis similar to my love affair with the Wave Filbert.  It was originally designed as a triple load strokework brush, hence the name Trifecta, however I'm not a strokework artist and I love this brush.  Now that I am free to sing its praises I am going to have to share with all of you some of the different uses for the brush.  Watch for those in the coming weeks. 

You can purchase the brush on my website and as far as I know I am one of the first sites to carry it.  I have a great deal going right now on the set with free shipping.  Come on over and take a look and be one of the first to purchase this amazing brush. 

Don't confuse this brush with Loew Cornell's Miracle Wedge, while it appears to be similiar the bristles on the brush are not cut quite as deep and it is much easier to use.  I purchased the Miracle Wedge because I wanted to compare the two and I wasn't thrilled with the Loew Cornell version.  I felt that the Miracle Wedge was harder to use and you didn't get the full impact of the brush because the bristles are cut deeper.  Take a look at my soon to be released free download project on the Paintworks site, hopefully it will be available soon, to see how I used the set of brushes to paint tropical flowers. 

Monday, February 7, 2011

Background Papers

I've been playing around with a number of different background papers when I can't find the exact colors that I want for my cards.   This is one example and then I stamped over the top of it randomly with a variety of stamps.  I'm sure that it will show up in a design somewhere, I just haven't figured out where.  I think that it is fun and certainly shows off the stamped design even if it is a little jumbled, however that is exactly what I was going for as I'm planning to cut sections out of it.  I'll keep you posted on what I do with it. 

Wednesday, February 2, 2011

Copic Markers

Have any of you used Copic Markers?  I received a set for a Christmas gift and I have to say I am hooked.  I've been working with them and love how easy they are to blend.  I haven't felt that there was much of a learning curve  but have just really spent some time familiarizing myself with the them.  I think that they are so much like painting that my thought process with them isn't that different.  I just recently completed some of the leaves similiar to the Jewel Tone Leaves that I have been painting and will post them soon.  Keep an eye out for my next post. 

Finished Card

Here is the finished product.  You can access the free project on my website.

Friday, January 21, 2011

Honeysuckle Leaf Third Installment

If you will notice the red areas on these leaves are beginning to darken,  I've added Metallic Festive Red between each vein.  This is the last shading that I will do to this and will next add a highlight and then will reveal the finished card.

Monday, January 17, 2011

Honeysuckle Leaf #2

I've added Alizarin Crimson to the red areas to add definition and deepen the shaded area.  I'm using a #2 round to paint this entire leaf.  Wash your paint into each veined area and layer each of these paint colors using more of a glazing technique.  I hope that you can see the additonal paint colors that I've added. 

Saturday, January 15, 2011

Prepping for Valentines Day

I started thinking about Valentines Day and of course spring especially when you consider that we haven't had a day without snow since Thanksgiving.  I thought that I'd start a new project that just might make a fun Valentines Card as well as put a dash of spice into our drab winter weather.  I've been busy painting leaves for a new pattern that should be out sometime soon and thought that a step by step leaf project might be a valuable resource for anyone interested in this new pattern as well as a sneak peak.  I chose to use the new hot color of the season according to Pantone which is called Honeysuckle except I used Electric Pink as the base and washed Peony Pink into the shaded areas of  the leaf. 

Do you like this project?   Paint along with me and we'll both have a finished card by the end of the process.  I'll post the next step soon. 

Monday, January 3, 2011

Creativity and House Elves

I'm posting a link to a talk by Elizabeth Gilbert that is fascinating.  http://www.ted.com/talks/lang/eng/elizabeth_gilbert_on_genius.html  For those of you who aren't familiar with her she wrote the book Eat, Pray Love and talks about the worry that many of us face that we may have already peaked in our artistic lives and may not have another creative thought that is worth sharing with the world.  She also delves into the idea of "Where Creativity Comes From"?  I have certainly been asked on many an occasion where did my inspiration come from and rarely do I have an answer, sometimes in the shower.  LOL.  Sometimes in the middle of the night and can be fleeting and if I don't write the idea down immediately can be gone forever.  That is certainly frustrating.   Elizabeth thinks that we have little elves similar to the house elves in Harry Potter who are responsible for our creativity and if something fails then it it their fault.  That is a fairly simplified version of her conversation but a part that appealed to me.  So if a pattern or a project fails to sell well it may not be my fault and instead is my creativity elves fault.  That certainly takes the pressure off of me to be "creative" all the time.  LOL.  I thought that her talk was entertaining and wonderfully insightful and can see why she is on the best seller list as well as having Julia Roberts portray her.  It could certainly bring about an interesting discussion.  I don't see Julia Roberts jumping up to portray my creative life.  I wonder why not?  LOL. 

Tuesday, December 21, 2010

Another Great Santa

Look at this tin Santa that was painted by Connie Bartch.  This is her beautifully painted rendition of the First Star of Christmas pattern that I have been demonstrating during the past month. She was nice enough to allow me to post her painted project and I hope that you will enjoy her lovely work and leave nice comments for her.   Thanks again Connie. 

Wednesday, December 15, 2010

Santa Card

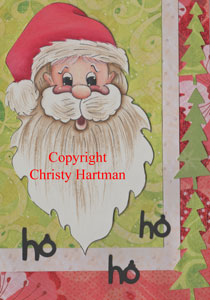
This cute guy was painted by Bev Atkins and she was kind enough to allow me to share him with all of you.  Isn't he fantastic!  I cheated and used my Cricut to make my letters and candy cane but Bev painted hers on and used a lovely green background.  I love it.  Thank you so much for sharing him with me and for letting me post him on the blog. 

Completed Santa


Whew!  I wouldn't have thought that this project would have taken quite this amount of time because it was an easy process.  It was an easy project but as we all know life gets in the way, but I finished this project up last night and can post the finished copy.  I used scrapbook papers for the background and used my Cricut Cartridge Christmas Cheer to cut out the lettering and trees.  I love putting projects together, it always seems like such a great way to finish up something that you've been working on and such satisfaction in the completed project.  Obviously you can completely paint the background if you prefer, use a variety to materials to decorate the cards such as sequins, brads, or found objects.  How about instead of using scrapbook papers using wrapping paper instead?  If you do something with this Santa face I would love to see the finished project, in spite of the length of time that it took me to complete it was very quick and easy.  I actually did four of these cards but am only posting the two that I liked the best.  This guy would look lovely done with either watercolor pencils, or even regular colored pencils. 

I'm not sure what the next series of blog posts will be about but check back often to see what I do in the New Year.

Sunday, December 5, 2010

Santa Face 2nd in the Series

I know that this has taken me all week to post the second in the series.  Believe me it has been a busy week.  But here is the second in the series and as I was painting Santa's face to post today it occurred to me that I hadn't posted the line art so you could paint right along with me.  Here it is!  I will post additional instructions as I paint.  Remember these painting instructions are only suggestions, you should feel free to change the colors to suit your style and mood.  Remember that you are painting on white paper so you won't need to base the areas that will remain white. 

Instructions for painting Santa's Face: 
1.  Base the face with Deco Art Americana Hi-Lite Flesh, float shade with Shading Flesh, highlight with Light Buttermilk.  Base the pupil of the eye with Lamp Black, dip dot with Snow White and float a light highlight float onto the eye.  Float the cheek with Spice Pink and deepen the float over the mustache with Antique Maroon. Base the inside of the mouth with Antique Maroon.  Dip dot the cheek with Snow White. 
2.  Base the hat with Santa Red, float shade with Napa Red, highlight with Light Buttermilk. 
3.  Using a rake brush thin Asphaltum down and wash it into the beard and hat trim areas and then float shade Asphaltum under the hat brim, around the face and under the mustache.
4.  Using a SL line the hair on Santa's forehead with Snow White. 

If you are painting along with me I'd love to see the result.

Monday, November 29, 2010

What Else Can I Do With this Santa Pattern? Santa Card Step by Step

In my last post I mentioned that I was planning to do a step by step demonstration using one of the Santa faces from the First Star Of Christmas Pattern.  I used the face from the tin santa and changed the hat slightly and painting this on 140lb hot pressed watercolor paper.  I've painted only the face adding the shading and highlighting and painted in the base color of the hat.  The next step will be to add the shading and highlighting to the hat as well as beginning the process of developing the beard, mustache, hair, and hat trim.  Check back soon to see this project develop into a Christmas Card for family and friends.

Sunday, November 28, 2010

What Else Can I Do With this Santa Pattern?

I hope that you all had a lovely Thanksgiving.  I know that I did, we had a very nice day although we ate too much.  LOL.  I'm sure that you didn't have that problem.  "Grin, grin."  We spent the day with family and friends and it was a terrific day eating a wonderful meal and awesome company.  After we had cleaned up the Thanksgiving dinner dishes my thoughts turned to Christmas shopping and we began planning our shopping day on Friday.  I had actually done some shopping prior to Black Friday so I was in good shape but still needed to pick up some specific items.  Honestly I am not a Black Friday shopper at unbelievable times in the morning, the thought of being out that early in the morning just horrifies me, however I did go to town later in the day and did some shopping and then finished up the remainder of it on Saturday.  I have a few more items to purchase prior to Christmas but am in really good shape.   What a great feeling!

My thoughts are now on getting ready to decorate for Christmas, the tree needs to be put up and the house transformed.  I started thinking about my patterns and thought which patterns could be adapted, I have numerous Christmas patterns that could easily be adapted to different surfaces but this Santa pattern appears to be the most difficult because of looking like it is so surface specific.  With a little creativity you could definitely adapt this to different surfaces and with my next few posts look for me to offer you ideas how to adapt one of these Santa's to be used on a card.  It can be done with just a few minor changes.  I'm going to do a simple step by step project that you can use to make your own Christmas cards and who knows I may even use the Cricut to add some interesting detail. 

Take a look at this project and think about the other options for surfaces for it.  As I stated above cards are an obvious choice but what about candlesticks.  Why not use this pattern to make beautiful candlesticks for your holiday table?  How about putting one of the Santa faces on the center of a plate to serve cookies or homemade goodies on and give the plate and goodies to your friends as a gift.  There are numerous great small wooden or tin plates that can be used that are relatively inexpensive and anyone would be delighted to receive a wonderful gift like that.  How about using one of those fantastic battery operated candles to adapt the pattern to.  I think that one of the round candles would be a fantastic small chunky Santa. 

Anyone out there have any other ideas?  Look for my next post starting the step by step Santa adapted to a card. 

Tuesday, November 23, 2010

What Else Can I Do With This Love Bug Boogie Pattern?

As I write this we are in the midst of one of the worst snow storms that we've had at this time of year for a long time, it is hard to think about spring being right around the corner when it is Thanksgiving.  LOL. We have a long winter ahead of us if this initial blast is any indication.  It seems ironic that I would choose to write about Spring when we have blizzard and driving condition warnings, but somehow it seems oddly appropriate.  I must be a glutton for punishment when I know that I am going to have a terrible drive to work in the morning.  LOL. 

That being the case, what might possibly be some ideas for other uses for this pattern since I am obviously wishing for nice weather?  Lets think about the obvious ones to start with, cards always come to mind and you can view the free pattern that I did as a companion to this pattern on this blog the "Night Light Bug".  Since completing that free project I've purchased a Cricut Die Cut Machine and could certainly use many of the different cartridges to add to and enhance this design.  You could add borders, change the painted lettering to one  using the Cricut fonts, and enhance the background.  How about finding an interesting poem to use on the inside of the card, print it out on your computer, use a great scrapbooking paper as a background thus personalizing the card for someone special.  Of course you could do the same thing for any of the bugs that are on this pattern and make an interesting card design to showcase the individual bugs either on the clips or on the candle holder design.  How about making a long thin card where the bugs flow down the front of the card similiar to the clips on the pattern.  Keeping that theme going why not cut out tags on the Cricut and paint the bugs onto the tags and add them to your Christmas packages?  Wouldn't your friends and family think that was fun and just a little quirky???  Imagine the fun they will have when they open their packages Christmas morning?

If you look carefully at the candleholder design you will see that it tells a story of a bug's night out dancing in the moonlight. Why not use that idea to paint a series of paintings as a storyboard on watercolor paper or cardstock, mount them either individually or as a series using matte board and an interesting frame.  This would be darling in a child's room or as a seasonal accent in your home.   Years ago when I first became interested in decorative painting it was all the rage to cut out individual pieces and hang them on your walls as plaques. Wouldn't these bugs look darling cut out as individual pieces to hang as accent pieces for the storyboard idea that I mentioned above?  Here's another thought paint the bugs onto the edges of the picture matte board to enhance the storyboard!  That would continue the design on out to the outer edges of the piece.  Some of my favorite pictures that I've hung in my home are those where the painting incorporates the matte extending the painted surface. 

Have you been listening to the news media and the concern over the body scans that airport security is using?  I'm not going to expound on the whole issue of body privacy in this blog but it certainly made me start thinking about my travel concerns for 2011 and one is certainly how to recognize my luggage.  Why not paint a luggage tag with bugs on it to help identify your luggage? 

How about painting a fun pin to wear with one or more bugs on it?  I love to wear pins especially my vintage pins that are family heirlooms.  As a teacher my students look at my jewelry  and comment on it and a bug pin would be a fun addition to my spring clothing wardrobe.  Ok, now I know that I've gone over the deep end if I am thinking about wearing cooler clothing when I decided to take a space heater with me in the morning because my classroom was so chilly yesterday.  I'll leave you with those ideas to mull over while we weather through the remainder of winter and think thoughts of snowmen and winter driving.  Like me it will give you something to think about instead of cold winter weather and concerns about driving, shoveling snow, and cold weather.  Have a wonderful winter season while you dream of nice weather to come.

Monday, November 22, 2010

Important change to the website!

I have made some changes to the Pattern Categories on my website that you will need to know to purchase your favorite patterns.  If the pattern is only available as an E-Pattern it is still under the E-Pattern Category.   However if the pattern is also available as a Paper Pattern Packet, that you will receive through the mail, the patterns are organized according to the pattern theme in the Menu.  To find the patterns that are available as both E-Patterns and Pattern Packets you will need to look through each pattern category.  I have placed a drop down menu to purchase either pattern type under the pattern description.  Simply click on either the Paper Pattern or E-Pattern and the red cart button and the pattern will be added to your shopping cart with the accurate price. I hope that this makes your shopping experience simple.