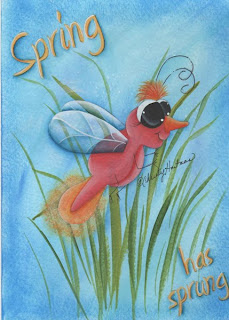
I'm getting ready to post a new free pattern on my website but am planning to archive my free patterns on my blog. This one was a successful pattern that I've had a great response from. If you liked it then it will be on this blog for a while yet and will try to get the new free pattern on as quickly as possible. I just recently purchased a Cricut and have been trying to familiarize myself with it by making cards for family and friends. My new free pattern will incorporate some of the Cricut features into the card. It has been a learning process learning to make good looking designs on my cards that don't take hours to make. I'm still in the learning process but am enjoying myself tremendously.
Night Light Bug
Christy Hartman
C. Hartman Designs
www.chartmandesigns.com
info@chartmandesigns.com
All patterns and designs Copyright © belong to Christy Hartman. All rights reserved. These projects may be painted for personal use/personal profit but may not be reproduced for graphic or scrapbook use for resale. Photocopying and all other types of mechanical reproduction are prohibited. Patterns may not be republished, distributed, transmitted, displayed, broadcast, or reproduced for any business/commercial purposes without written permission from the artist.
Palette: Deco Art Americana
Spice Pink DA030
Melon DA251
Antique Rose DA156
Tomato Red DA160
Ocean Blue DA270
Navy Blue DA035
Snow White DA01
Indian Turquoise DA087
Tangerine DA228
Bright Orange DA228
Moon Yellow DA07
Black DA067
Light Buttermilk DA164
Hauser Medium Green DA132
Hauser Dark Green DA133
Olive Green DA056
Brushes: Dynasty Black Gold®
Series # 206FW: ¾”
Series # 206A: 3/8”, ½”
Series #206SL: #5/0, 20/0
Series # 206R: #1, 2, 4
Series #206WVFil: #4
Series #300 Deerfoot: ¼”
Series 206 BSS: Small Butterfly Angle Brush
Small Stencil Brush
Use the brush that best fits the area to be painted.
Load your ¾” FW brush with Snow White dip one corner of your brush into Indian Turquoise, and the other corner into Ocean Blue, take that brush directly to your piece and blend the colors using a slip slap technique directly on the card, blending your paint back and forth in a random manner. Using a stencil brush dry brush Ocean Blue around the outside of the card. Using the small angle butterfly brush load the brush with Hauser Medium Green, dip the point of the brush into Olive Green and the heel of the brush into Hauser Dark Green. Stroke the grass onto the card. Transfer the design to the card and float shade Navy Blue around the design elements.
Bug: Base the bug’s body with Spice Pink, float shade with Antique Rose, deepen with Tomato Red. Using the #4 Wave Filbert wash additional shadows into the shaded areas with Tomato Red. Float highlight with Melon and deepen the highlight with Light Buttermilk, using the #4 Wave Filbert wash additional highlights onto the body using Light Buttermilk. Base the underbelly with Melon, shade with Spice Pink, deepen with Antique Rose, and highlight with Light Buttermilk. Wash additional highlights onto the belly with Light Buttermilk using the #4 Wave Filbert.
Wings: The wings remain the color of the background, float highlight the upper portion of the wings with White and using the #4 Wave Filbert wash additional highlights onto the wing making sure to round your lines as you paint. Float shade with Navy Blue washing additional shadows onto the wing with the #4 Wave Filbert. Using a SL line the wings with White.
Nose: Base the nose with Tangerine, highlight with Moon Yellow, float shade with Bright Orange.
Tail: Base with Moon Yellow, float shade around the inner portion next to the pink tail with Bright Orange, float highlight with Light Buttermilk. Stipple with Moon Yellow, Bright Orange, and White around the outer edge of the tail.
Eyes: Base the eyes with White and the pupil with Black, dip dot the pupil with White and float a White highlight onto the pupil.
Hair: Using a SL line the hair with Tangerine, Bright Orange, and Moon Yellow.
Lettering: Transfer the lettering and base with Moon Yellow, using a SL line shade with Bright Orange, and line highlight with White.
Finishing: Line with a 01 Micron Permanent Black Marker.
© Christy Hartman
