Sunday, August 11, 2013

Vacation Photos Part 2


I loved this photo, you can see in the foreground of this photo the rock outcropping and when the tide goes out this area is accessible as Tide Pools.  We enjoyed walking down at the beach and seeing the star fish, mussels, sand crabs, and small fish to name just a few of the sea creatures that we saw.  We showed our nephew and his friend the Tide Pools but honestly they were more interested in sand surfing that sharing in the Tide Pool discoveries.  LOL. 

Have you ever watched sand surfing or sand boarding?  It is a fun activity and was new to me, the boys used boogie boards or an actual sand board which looked like a small version of a snow board and would literally board down the sand dunes.  I think they had sand in parts of their bodies that I'd have preferred to not but they loved it. 

I've been fortunate to visit a number of tropical regions and have watched surfers in Hawaii and in the Caribbean but for some reason surfing in the Pacific seemed more impressive to me probably because it was too cold in my opinion to get into the water to wade let alone surf.  Naturally they all wore wet suits but even with a wet suit I'm afraid that it would have been too cold for me. 

Tidepools and Sandstone Cliffs


You can see Haystack Rock shrouded in mist but you can also see the sandstone cliffs above the beach with the Tide Pool areas.  Loved those Tide Pools. 
 
Also loved going to the coffee shop most mornings after our walk on the beach which is in the building on the right where there is a yellow flag outside. That was our treat after a cold morning on the beach.  LOL.   Another favorite spot of ours was the Pelican Pub which is directly to the right of the parking lot, great micro brews and awesome local food.  If you turn around and looked out on the beach you would see the scene shown above.  

Vacation Photos

My husband and I just returned from a glorious week spent on the Pacific Coast, we rented a beach house with my sister and her family and had an absolutely marvelous time.  What a restful restorative week we had!  We have been to the coast a number of times but this is the first time that we stayed in the same place for any length of time and enjoyed the scenic beauty of the area.  We stayed at Pacific City which is a small town a 30 minute drive south of Tillamook and has a really glorious beautiful beach.  The town is small and quaint devoted to the tourist trade and water sports that are popular in the area.  The house that we rented was a short walk from the beach and we spent all but one day walking the beach and enjoying the tide pools, shell collecting and were finally brave enough to wade toward the end of the week.  We were actually forced to wade since the surf came in and washed all around us while we were collecting Sand Dollars on the beach.  No swimming for me in the Pacific without a wetsuit, much too cold.  I am a very warm water ocean swimmer, I admit it I am a baby when it comes to the cold, surprising considering that we live where we have winter 9 months of the year.  During our numerous trips to the coast we have rarely had the experience of a really warm weather  and usually freeze and this trip was no exception however, maybe because it has been so hot for much of the summer this year the cooler weather was really refreshing.  The fog shrouded the coast much of the time but when the sun was out we quickly snapped photos and unzipped our jackets and enjoyed the brief but glorious sunny moments.  LOL.  We did not let the cooler foggy weather change our plans and did everything that we had planned just bundled up!  Most mornings during our walks on the beach we wore pants, polar fleece jackets, and a rain jacket to protect us against the mist and were usually comfortable.  By the afternoon we could change into shorts but still needed a sweatshirt or jacket, but by evening we were turning on the gas fireplace to keep the house comfortable.  We laughed that in August we were using the gas fireplace, we wouldn't have been doing that at home.  LOL. 

The Pacific City beach has a gorgeous rock out in the ocean which is a landmark for the area and is called Haystack Rock, I snapped a number of photos of it during those brief moments of sun and of course when it is shrouded in mist.  From this beach we watched surfers, the Dory Boats take off and land and watched kids sand surfing.  I used my phone to take these photos and was really pleased and surprised with the quality. 

Haystack Rock is a favorite subject for artists around the area and I can see why, it was beautiful. 


Friday, August 2, 2013

Angel Jump for Joy Ornaments

I have been working on these all week trying to get them ready to put on my website and get them out.  These are so fun to paint, I used scrapbooking papers for their dresses which really sped up the painting process and wanted papers which were more of a neutral tone and I also wanted to make sure that I had a blonde, a brunette, and a redhead in the mix.  I will be carrying the wood pieces for this pattern as well and the laser cut wood pieces are so fantastic.  I can't wait to start selling them so you can see the quality.  Each wood piece is approximately 4"  tall and 3" across which is just the right size for a Christmas ornament although I can see these painted on so many different surfaces.  Do you have an angel that you'd love to paint these for?  I'd love to hear your thoughts and I am hoping to get these on the website very soon for sale. 

Halloween Jump for Joy

I'm working on it and am in the final stages of editing the pattern so............... it is coming very soon.  I'm anxious to get it out to all of you and see what you think.  I love these guys and spent all day today taking photos trying to get close-ups as well as the pattern photo.  There will be 5 photos included in the pattern showing close-ups of each character.  I will be carrying the pattern as well as the ornament pieces that are laser cut and a fantastic quality.  A quick coat of sealant on the front and back and you are ready to start painting.  Because they are laser cut there is no sanding to be done on the sides of the piece, absolutely fabulous.  I have a Halloween display piece where I display small Halloween ornaments but if you don't then paint these on different surfaces.  How about a canvas, a treat bag, as an insert to a picture frame, on a bowl to give out candy, a plate, etc.  I can't wait to share these with you.  What do you think? 

Monday, July 29, 2013

Halloween Jump for Joy

Another whimsical design that isn't a pattern yet but will soon be ready for publication.  This is a sneak peak of my Halloween Jump for Joy pattern.  I love these chubby little characters and would love to see these painted on a different surface, a treat bag, or Halloween candle stands, a photo album.  I like to design projects that have potential for other uses other than the one that I have completed.  Wouldn't these be cute on small canvases?  Any ideas? 

Samplers

I am known for my whimsical designs, at least I think so.  LOL.  When I was a child I always wanted to be an animator for Disney or a book illustrator.   Are you starting to see where the whimsical side comes from?  Needless to say neither of those aspirations came about but I do love designing whimsical designs.  These seasonal samplers are very whimsical in nature and in my opinion speak to a more vintage time period of quilted and needlework samplers.  Curious to see what all of you think.  This pattern called Samplers through the Seasons is available on my website and the wood pieces are available from the guys at Ideal Wood Products Inc. 

Designing

I love to design, I love the potential and the ideas that come to mind whenever I dream up a new project.  When I was younger I sewed most of my own clothing and always loved picking out the pattern, fabric, but then when it was time to get started had a hard time getting started.  Once I was going it was all good but it was that boring, monotonous time period of pinning the pattern onto the fabric and cutting it out that I hated.  Because I was a 4-H sewer I always had to finish my seams which I also found very boring.  Can you hear my voice saying boring????  Well times have not changed and I am still a procrastinator when it comes to getting a new project started, I still dislike the boring parts of painting.  Oh don't get me wrong I love to paint, it is an important part of my life but base-coating?????  Seriously does anyone like to base-coat.  I suppose there are folks out there that do but I find it tedious and unfortunately a necessary part of the process.  So I set myself down at my painting table and force myself to do the boring, tedious things that I find distasteful.  So imagine my jubilation when I decided on one of my last projects to use scrapbooking/patterned papers for the coat on  my characters.  I've done this before, it wasn't anything new but I am happy to report that I eliminated the boring step of base-coating by doing this.  Will I use paper on all of my projects?  Probably not but I do like it on this one.  I decoupage the paper onto the wood piece and then added some shading and highlighting to make the areas pop and loved it.  Like I say this isn't anything new but I have to say that I enjoyed this part of the process more than base-coating.  LOL. 

This is a pattern that I did called HO! HO! HO! Santa Picket Ornaments and I love it!!!! The patterned papers just added the visual punch that these guys needed.  This pattern is now available on my website and you can purchase the picket ornaments from the guys at Ideal Wood Products Inc www.idealwoodproductsinc.com  You might have to call them to get the wood pieces as I'm not sure if they have had time to get them on their site yet.  Loved them. 

Wednesday, July 17, 2013

Copic Marker Journaling and Papers to Use

Copic Markers are an amazing media and the best thing for is that they travel really well.  I take them with me whenever we travel choosing a limited palette and can work wherever we happen to be.  There are amazing tutorials out there on You Tube that will actually help you use this media if you are interested.  One tip that I'd like to mention is to use paper that will hold up to the alcohol inks or to at least put a couple papers behind to catch any bleed through that is bound to happen.  Someone asked me the other day if they should use watercolor paper with Copics and my response was to use a paper that has a smooth finish because your markers should glide across the paper rather than just being absorbed.  Watercolor paper will absorb your markers and you will not be able to blend as easily, not to mention will use up your marker rather quickly.  Of course you can always refill your marker but why not use papers that will lengthen the life of the marker?  There are numerous good quality papers out on the market that you can use very effectively to have a beautiful result, look for papers that are designed for marker use.  Canson, Strathmore, Stillman, Stonehenge just to name a few, most scrapbooking/stamping stores carry good quality paper that they recommend to their customers.  Try some out to see your personal preference. 
This project was completed on Strathmore Paper. 

Monday, July 15, 2013

Journaling 2

I have been working quite a bit in my journal this summer and am really enjoying the process.  We've done quite a bit of traveling this summer and my journal travels with me easily. I have a really small travel sized sketchbook and I've always taken it with me whenever we've traveled, it is great for sketching out quick ideas that come to me, fleshing out a project that I'm working on and just doodling for the sheer pleasure of doing just that. In fact I was sketching while I waited for my husband at his eye appointment the other day.  However I've kept my Journal for more formal or should I say finished projects.  I've been using my Copic Markers to complete these pages allowing me to work out some color combinations that I am interested in using, however this page is actually done with watercolor.  Twinkling H20's to be exact.  The beauty is that if I don't care for the combination then I just redraw the image and try a new color combination.  That is my idea of what a journal is meant to do, allow me to creatively and freely explore ideas, concepts, and just have fun without worrying about completing something that is artistically pattern ready.  

This is the third page that I am sharing where I was exploring a variety of different doodled ideas. 

Thoughts? 

Thursday, July 11, 2013

Journaling?

I love this term because it makes playing in your sketchbook sound so official!!!  LOL.  Seriously I love the term, it kind of reminds me of when Zentangle started to take off and is such a phenomenon and I thought, "I didn't realize that my doodling could have made me money.  Why didn't I think of that?"  It is a brilliant concept and I applaud anyone who has the vision to take an ordinary activity and make it amazing, and that is what has happened with Zentangle.  Who would have thought that Journaling would take off like it has?  Again, that is amazing to me and I again wondered why I didn't think of that.  Maybe I could have quit my day job, most likely not.  So instead I'll just enjoy the activity, that sounds easier and more productive than bemoaning my uninspired fate. 

In my last blog post I showed you a journal page that I had worked on using my Copic markers. I thought that today I would share with you a page that I did using just black and white.  I don't think that I will add color to this one, I think that at times black and white is very powerful and I like the way that this turned out.  I'm fascinated by lettering and using lettering in my designs.  I've had limited exposure to the art of lettering and really would like to expand my skill, I'm currently looking into different options to do just that. 

Who knows where this new interest will take me?  Maybe I'll become inspired to capitalize on some activity that I've taken for granted all these years and write a book, in my spare time of course.  Most likely won't happen so instead I'll just use all of you as my sounding board.  Thanks for the opportunity. 

  Thoughts?  I love getting comments.  They make my day.   

Sunday, July 7, 2013

Doodling 1

Wow, I didn't realize how long it had been since I last blogged.  I have been really busy, you'd think that school was still in session.  LOL.  I've had a number of family obligations that required my time as well as trying to use my time to get some painting done.  And maybe trying to have some fun in between.  So.................... 

Do you doodle?  I'm always in awe of those of you who Zentangle!  I have never really gotten the Tangling bug but I do love to doodle and recently took a class from Joanne Sharpe called Doodle Arts and Letters and it was fantastic.  I've been wanting to take one of her classes and this one just spoke to me. 

I have always kept a sketchbook, in fact usually have quite a few of them in the works and love to just sit while I watch TV and sketch, in fact some of my best designs have come out of a spontaneous opportunity to just let my fingers and mind play. My Jump For Joy characters came out of one of those mind drifting zen moments.  I've also started Journaling which I find hugely entertaining and can be very inspirational as well. 

I feel that my artistic style can easily be considered whimsical and Joanne encouraged whimsy in her class which was right up my alley.  I'm going to share a few of my Doodles that I've completed since taking her class.  I'd recommend her class highly to any of you who have wanted to try an online class. 

This first piece that I am sharing is a whimsical look at flower design and colored with Copic Markers.  What do you think? 

Wednesday, June 5, 2013

Jump for Joy Characters

I am so happy with the Jump for Joy characters and am starting to work on the Halloween set which are also just darling.  They will be available as wood ornaments that can be displayed or painted on Trick or Treat Bags.  Wouldn't that be adorable!!!  I guess I had better get busy because they are calling to me. 

Like many of you when I paint I don't really want to use the same surface that the artist has painted the pattern on.  I want to add my own spin to a project and use a surface that is more appealing to me.  That is what I love about the Jump for Joy characters, they can be painted on so many different surfaces and used in so many different ways.  The sky is the limit.  I hope that many of you will share with me your creative uses for my patterns. 

When I designed the four boys for the All Seasons Bank I put them on a bank but you could easily put them on anything including cards.  I show these boys in all four seasons so imagine what you could do with them.  Here you see all four of the boys on the pattern.  I love them and love that they are boys although if you wanted them to be girls it is just a simple matter of changing the hairstyle which would be an easy fix.  Someone asked me when I'd do the girls and laughed because when I designed these thought how easy it would be to give them longer hair to be used as girls. 


This pattern is available at www.chartmandesigns.com under the Jump for Joy pattern category. 

Spring Erik Mixed Media Canvas


I finished it!!!!  Love him.  He is painted and would make a darling canvas to put on display during the spring and summer months or put into a child's bedroom.  I'm delighted with how the background turned out and used some rubons to add interesting elements. Have you ever used rubons?  I hadn't used them before discovering them this fall and now I love them.  What an easy exciting way to add detail and interest to your projects.  I always decoupage over the top of rubons so that they become permanent on the canvas.  I love this stamp and would love to see what you do with the stamp or with the pattern.  It just goes to show that there are so many different options for a pattern if you think outside the box.  Any thoughts? 

Did you read in one of my previous posts about the coupon code that I am offering to any of you who email me?  Hope to hear from some of you. 

Monday, June 3, 2013

Spring Jump for Joy Mixed Media Part 10

I was concerned about making sure that the blue water showed up on the blue background and I was happy with the result.  I really tried to convey the look of the water splashing all over the place when this little boy jumps in the puddles.  What do you think.  Funny thing is I just realized that I've never dry brushed the little boys cheeks.  LOL.  Soon!!!!  I'm delighted to receive your comments and it means so much to me that you are enjoying this series of posts. 

Spring Jump for Joy Mixed Media Canvas Part 9

Starting to work on the splashing water.  I'm still having fun with this little guy.  Once I am finished painting him, I will start working on adding additional detail to the background in the way of rubons. 

Spring Jump for Joy Mixed Media Canvas Part 8

Added the face.  Thoughts? 

Spring Jump for Joy Mixed Media Canvas Part 7


I've been busy painting this canvas and think he is darling.  I haven't heard from any of you so I can only imagine that you are keeping up with this series as he is progressing.  I've been trying to post weekly and even daily to some degree as time permits.  I'd love to hear from you. 


Sunday, June 2, 2013

Spring Jump for Joy Canvas Part 6

The shaded areas really made this rain slicker and boots come to life.  Are you painting along with me?  I added Deco Art Glamour Dust Champagne paint to the rain slicker, hat, and boots to make them pop off of the canvas.  The photo doesn't do the glitter paint justice.  Bummer!

If you want to add the boy to your canvas you can purchase the E-Pattern off of my website at
the following link http://www.chartmandesigns.com/store/WsDefault.asp?One=192 or make your life easier and purchase the stamp from Treasured Times Rubber Stamping http://treasuredtimesrubberstamps.com/products/our-stamps/hartman/erik-spring-time-jump-for-joy-christy-hartman/ 

Just a little hint, very soon this little guy is going to be available as a set with some really adorable rainy day stamp items.  I also know that the owner Jody Stacy is planning to offer him as a digi stamp.  How easy is that?  One of these days when I have a chance I'm planning to Decoupage the image that I colored using my Copic Markers to a canvas.  Wouldn't that be cool? 

Interested in using the same Copic Markers that I used to color him?  Remind me and in one of my posts I will list the markers that I used. 

As an unannounced bonus to any of you who really want to paint this little guy I'm offering a coupon code to anyone who emails me interested in this pattern on my website for 20% off of your entire order.  info@chartmandesigns.com Just mention in your email something that you have enjoyed about my blog and enjoy a one time use coupon.  Checking to see if anyone really reads these posts.  LOL. 


Spring Jump for Joy Canvas Part 5


Still working on this little rain boy and have added the yellow to his slicker, hat, and rain boots.  He is coming along.  Slowly but surely.  LOL.  Tomorrow I will add the photo showing the shading and highlighting on the yellow areas.  I love the background, he just pops out.  Now to figure out how to paint the puddles so they pop out of this blue canvas.  Can you see the bees on the front?  I love that stencil from Crafter's Workshop, it was an impulse purchase and I'm really happy that I felt the need to own this one.  LOL. 

Monday, May 27, 2013

Mixed Media Jump for Joy Canvas Part 4


I purchased this stencil this spring because it was so darling I just couldn't resist, when I started this canvas I debated about using it and finally decided that it was perfect for a springtime canvas.  Bees don't come out when it rains but I decided that I could use a little artistic license.  LOL.  I'm so happy that I did because they are darling in conjunction with the blue.  This is a newer Crafter's Workshop stencil and was fantastic.  I used black and yellow to add the bees.  When I colored Erik with my Copic markers I designed his slicker to be yellow and am planning to do that this time.  I always like to repeat colors throughout a design as that helps your eye move through the entire piece, repeated elements whether color or design elements work in the same manner. 

I am having a ball with this piece.  It is turning out just as I had planned.

Mixed Media Jump for Joy Canvas Part 3


Here we are in part three of this canvas and I've added the boy and gessoed him because I want him to be the most important part of this canvas.  I want him to be the focal point even though I absolutely love the background on this piece.  Occasionally I may want a character to be transparent so that the layers on the canvas will show through but not in this instance. 
 
Use your stamp to transfer the boy to the canvas.  What an easy way to transfer a design. 
 
In the next few days I will start adding paint to the boy and begin to define his character.  So far I am loving this canvas.  What are your thoughts?  

Mixed Media Jump for Joy Canvas Part 2


I'm back and working on the canvas in this series of blog posts.  I hope that you have decided to paint right alongside me, won't that be fun?  I ordered a variety of new templates and masks and decided to use one of them on this canvas.  This Doily Template is available from KaiserCraft and I loved it!  I have been looking for plastic doilies that I could use as stencils and have not been able to find any locally but found this template on line.  It was wonderful to use and just the right size for this canvas.  I applied Sapphire paint with this template. 


What do you think?  Is this a painting style that you enjoy?  Leave me a comment and let's have a conversation. 

Mixed Media Canvas Prep Part 1

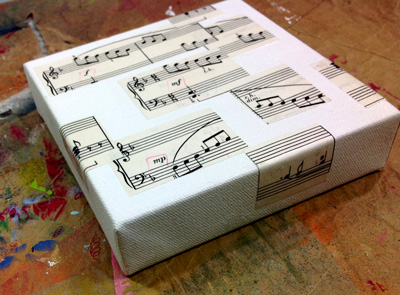
I finally had time to sit down this morning to start the canvas background that I have planned for the Jump For Joy stamp.  I recently went shopping at some of my local second hand stores and found some darling sheet music that I have been saving for just the right project.  I used one piece on my Froggy Went a Courtin' Pattern and used a page on this canvas.  I used Deco Arts Decou-page which I have blogged about before and I love it!!!  I cut the sheet music apart so that I could randomly attach it to this canvas.  I used a 6"X6" deep edge canvas which will be a perfect size for the image that will be painted on this. 
 
Next it was time to paint the background.  I wanted this to be a random paint application and used three paint colors.  You can see the paint that I used in the photo below and how I loaded my brush to apply the paint.  I used a slip slap brush technique and blended the paint back and forth across the music papers allowing some of the paint to be more transparent so we could see the sheet music and other areas to be more opaque. 


I then decided that I wanted to use some Washi tape on the piece to add further layers and dimension.  The Washi Tape that I used is available from We R Memory Keepers. 


What do you think?  Are you going to paint with me?  Let me know what you think by leaving me a comment.  


Friday, May 24, 2013

Erik Spring Jump for Joy Stamp

I am so delighted to announce that my first stamp has hit the shelves and I am thrilled with how he looks. This has been a process trying to find a company to work with and I finally found one that I think is going to work out beautifully.   I am working with a wonderful independent stamp company called Treasured Times Rubber Stamps http://www.treasuredtimesrubberstamps.com/products/our-stamps/everyday/ This little boy is part of my Jump for Joy series of characters which is new to my website in the form of ornaments and designs for wood pieces, I now can say that you could easily mass produce him on a variety of surfaces by using this gorgeous stamp.   I used my Copic Markers and colored a sample of him but he can also be found on my pattern the Four Seasons Bank where you will find the painted instructions for him.  I am so excited about his new venture and am planning a number of other stamps in this line which will come out later on this summer including a darling set for Halloween.  I recently hinted at this stamp in a post showing the canvas that I am going to paint him on using mixed media techniques and you can watch this canvas progress over time.  Head on over to Treasured Times and check him out, hopefully you won't be able to resist this cute little guy. 

This photo is actually from the pattern and is just as cute as the one colored with Copics.  Love him!!!!!!!!!

Tuesday, May 21, 2013

Spring Jump for Joy Canvas

It has been a while since I last blogged, it seems like life can just get in the way of my creative time.  LOL.  But I am back and ready to get started on a new canvas which will showcase a new stamp that I will soon have available from Treasured Times Clear Stamps and Scrapbooking.  www.treasuredtimesrubberstamps.com and I am so thrilled to be working with this wonderful company.  Rubber stamping isn't just for card making but can easily be used on canvas as well as in a variety of creative ways including decorative painting.  As you know I love using stencils in my artwork and just purchased a number of new stencils from Crafter's Workshop and a new template from Kaisercraft and I can't wait to use them.  I had also picked up some sheet music at a second hand store that I think will be great incorporated into this canvas.  This is just a teaser showing some of what I have planned for this canvas.  Hopefully you will check back often to see what's in store.  You can see this progress from start to finish and will hopefully love the stamp that I am going to use on this.