Tuesday, January 22, 2013

Lumiere and Neopaque Mixed Media Canvas Part 2

I am here to report on my progress on my most recent mixed media canvas.  I used a variety of scrapbooking papers, paint, and Faber Castel markers on it.  I still need to finish the other two girls and am thinking of a blond and a brunette or maybe two blonds. LOL.  Not sure what they are wanting to become as of yet.  They seem to have acquired their own personalities.

I've enjoyed this project and the word spontaneity comes to mind when I am working in mixed media.  I have never really considered myself  a spontaneous artist and have always enjoyed detail and a plan but am finding that I really am enjoying the process and the freedom that mixed media allows. Anytime that we as artists can move outside of our comfort zone and try something new will certainly help invigorate our art and inspire us to reach for that creative star.  I'm looking forward to finishing this canvas and seeing it develop the personalities of the three girls.

I'm curious about your thoughts.

Sunday, January 13, 2013

Jacquard Paints Lumiere and Neopaque


I just started another mixed media canvas this afternoon and every time I work on one of these it just makes me happy.  The freedom that I feel when working on a canvas gives me great joy.  I've incorporated my Washi Tape made using my Gelli Arts Printing Plate that I blogged about earlier, Prima Marketing Washi Tape, cardstock, scrapbooking paper, Stamp Washi Tape from 7 Gypsies Journey, a variety of Crafter's Workshop stencils,  and used Jacquard Lumiere and Neopaque paints.  I used Pearl Turquoise #571, Halo Blue Gold #556, Pearl Blue #570, and Halo Pink Gold #555 in the Lumiere line.  I also used Neopaque White, Blue and Turquoise.  I used a 3/4" brush to slip slap the paint onto the canvas in a random manner and using my finger randomly blended the Lumiere Metallics onto the canvas.  Used Americana DecouPage to attach all of the pieces to the canvas.  

I am very fond of these paints, they are absolutely luminous and the metallic paints are some of the best that I have ever used.  You could easily substitute different paint brands and paint colors, in fact I'm sure that Deco Art Americana has paint colors that would work beautifully.  Once I have started working on the foreground of this canvas I will post my progress as I go.  

I'd love to hear what you think of these mixed media canvases.  


Thursday, January 10, 2013

Life Book 2013

I've mentioned in previous posts that I have began taking online Art Classes this past year and LOVED them.  I loved the convenience of being able to watch the classes whenever I have time and can rewatch as I need to revisit techniques.  What a marvelous invention that has allowed so many of us that live in rural areas access to amazing teachers and classes that I might never have had the chance to attend.  I'm still in process of watching my classes from Christy Tomlinson but the beauty of them is that I have access to them for a year so I have plenty of time.  Now just to make sure that I can watch each class before I am cramming them in at the end of my year time frame.  LOL. 

Because I am so enamoured of these online classes I decided to take the plunge and do a year long art/creativity class from Tamara Laporte called Life Book.  http://www.willowing.org/life-book-2013/   It is a year long mixed media class where we will learn new techniques and reflect on our art journey.  I was torn because I still had not finished or even started a few of the classes that I had already signed up for but decided to take the plunge and go for it anyway. 

We began our journey this week and so far it has been fantastic.  I've only completed one of the projects for this week but have loved the process so far.  I think that the best thing about the class for me has been connecting with artists around the globe who have similiar interests and sharing our projects.  What a great opportunity to be able to see how other artists have interpreted the same set of instructions.  I'm sharing my first project which was completed using 140lb cold pressed watercolor paper and using Tim Holtz distress inks for the background, Faber Castell WC Pencils for the angel, Faber Castell Pitt Artist Pens, and a variety of rubons for the background.  What fun it has been. 

If you are interested take a look at the class, there is still time to join and I assure you that you will love the process as well. 


Wednesday, January 2, 2013

Printing Using My Gelli Arts Printing Plate and Jacquard Paints Part Two

Hello Again!  I'm back sharing some of my prints using my Gelli Arts Printing Plate.  I'm still not 100% happy with these and am sure that as I use the plate more often I will become more comfortable with it, but then I am comparing my prints to Joan's prints who is the owner of the Gelli Arts Company.  That is a hard act to follow, she is amazing.  I've tried a variety of paints on the plate and like some better than others.  The Jacquard paints worked really well and especially well on the Washi Tape as it is a luminous flexible paint, my Deco Art Americana Paint worked well, I also tried my Traditions Paint on the plate and the prints turned out well but the paint stained my printing plate.  Be aware of that, it doesn't bother me that the plate is slightly stained but it might bother you.  Next I'm going to try using my JoSonja paints and see how they do. 

This is a print that I used my Traditions paints on with a number of different stencils to form the texture and then sprayed the background with my Dylusions Ink Sprays. 
This was printed using Deco Art Americana Paints and added a touch of Glitter Paint to the print, then wiped off using my Catalyst tools.  I like this one and think that this can be used somewhere as perhaps a background paper.  Not sure but will wait and see where it ends up. 

I'm curious as to your thoughts or what are you doing with your plate that is fun and exciting. 


Tuesday, January 1, 2013

Gelli Arts Prints with Ranger Dylusions Inks Part 3

I'm sharing a few more prints that I've completed using my Gelli Arts Printing Plate.  The first one was a happy surprise becasue as a print I wasn't very happy with it and actually printed onto the back of the paper and when I sprayed the back of the paper the color came through onto this print and then all of a sudden I really liked how it looked.  Made me laugh out loud because sometimes accidents happen and have great results.  Just goes to show how fickle the creative process can be. 
I used a variety of Deco Arts Americana paints and assorted stencils, then sprayed the back of this piece with my Dylusion Inks and love this one.  I am keeping this one.  LOL.  Happy Accident. 

This is the print that is actually on the back of the print show above.  LOL.  This was a ghost print that reminds me of footprints.  I sprayed greens and turquoise Dylusion Inks onto it and liked it but like the one on the back better.  What are your thoughts? 


Gelli Arts and Ranger Dylusion Spray Inks

I recently had the chance to spend some time playing with my Gelli Arts Printing Plate www.gelliarts.com and experimented with different paints, used my Catalyst Wedge Tools, and used my Catalyst handled tools.  Of course they all worked great although I still need to play more to really feel that I know what I am doing.  I am still such a novice at this.  The Wedge tools work wonderfully, I received some handled Catalyst tools for Christmas and really loved working with those as well and liked that I had the option of working in smaller areas.  Thanks kids for the Christmas gift.  I also received a set of Dylusion Spray Inks as a gift for Christmas and decided to try the sprays in conjunction with the prints that I had made.  How fun was that.  I'm sure that I can use some of these as background pieces for cards or in conjunction with mixed media canvases. 

This is one of my favorite pieces, I used my Jacquard Neopaque and Lumiere paints in the printing process and then sprayed the dry piece with the Dylusion Inks.  I used yellows and greens for the sprays. 
This print is similar to the one shown above, printed using the same Jacquard paint but sprayed with orange and yellow inks.  Love it!!!!

This is actually a ghost print printed while I was printing the Washi Tape from my last post but then sprayed it with Dylusion sprays.  I thought that it was boring as just a print but once I used the sprays with it I thought that it was stunning. 

Printing Washi Tape using Jacquard Neopaque and Lumiere Paints

Good Morning and Happy 2013!  I wish you a Happy and Productive New Year.  My new year is starting out well, I've signed up for a year long online class called Life Book and I watched my first video and have started my first class project.  I'm excited to be participating. 


I have to say that I recently watched a You Tube Video by the Journal Junkie http://feliciathejournaljunkie.blogspot.com/ printing "Washi Tape" with the Gelli Arts Gell Printing Plate and was inspired.  I decided to give it a try using my Jacquard Neopaque Paints and loved the result.  I printed these using similar techniques described in the video and there are a few things that I would do differently next time, I placed my masking tape on paper to print it and I would instead place it on a plastic sheet because by the time I took my tape off of the paper some of it had adhered to the paper.  I'm sure that I have enough to use for a while however.  LOL  Here is a photo of the tapes that I printed. 

 
I then decided that I wanted to use some of it on a canvas and chose to use the red tape. 
 
 
Love it!!!!  The tapes were easy to make and are gorgeous and what a great use of my Gelli Arts Printing Plate.  Once I use these up I will do this again and it was certainly more economical that using purchased Washi Tape.  I wonder do they make white masking tape?  White would make a really gorgeous tape as well.  Anyone know? 


Sunday, December 30, 2012

Announcing the Jump for Joy Series of Patterns available at C. Hartman Designs

I have a new line of patterns that are available called the Jump for Joy Collection showcasing children and seasonal characters jumping for joy showing that zest for life that many children have.  The first pattern in the line is currently available at www.chartmandesigns.com and even has its own Pattern Sub Category.  This pattern is called the Four Season Bank and shows children "jumping for joy" during the four different seasons.  I think this pattern has so many possibilities including being painted on the adorable bank that I've painted it on.  I can see this pattern painted on ornaments, individual canvases, scrap booking pages, journal pages, desk lamps, checkbook covers, the sky is the limit.  The Love Bug Boogie has always been an extremely popular pattern and I think that this one could as well.  Come on over and take a look, I hope you will love this pattern as much as I do. 


I have a number of patterns planned for this collection, the next should be out in time for Easter and then look for a set for Halloween and Christmas.  Take a look at the card that I have available that I blogged about earlier this week for a hint for a future project. 

I'd love to hear your thoughts about his pattern and the collection. 

Friday, December 28, 2012

Handmade Cards Available at C. Hartman Designs


I have just added a series of handmade cards on my website, they can be found under the Artist Originals Category in the Main Menu. There are a limited number of cards available for sale, but if they sell well I will make more cards. I am test marketing a line of cards to see how well they are received. Let me know what you think. Each card is different and unique and no two are exactly alike. Come on over and see what you think.


Mixed Media Canvas Part 2

Here are the second set of mixed media canvases that I mentioned in one of my previous posts.  These were painted using my Jacquard Neopaque paints and Jacquard Lumiere metallic paints and in a similiar manner as the earlier set although I did not add the Alcohol Inks to these, I didn't feel that they needed the additional burst of color and actually wanted these to be more subdued.  I also spent more time blending the paint with my fingers and you can see the result in the sky on both, the clouds definitely pop more on the Turquoise canvas.  Obviously one is designed to be a fall canvas while the other is going to be spring or summer.  The leaves were stenciled using a Laurie Speltz Background stencil while the stars were formed using a piece of vellum and a Martha Stewart punch.  You do not have to use a traditional stencil but can make your own using a variety of materials.  Anything that forms a mask will do the trick.


I'm not sure what I will put on these canvases.  Any suggestions?  I don' have a plan for these.


Thursday, December 27, 2012

New Patterns

These new patterns are finally on my website www.chartmandesigns.com for purchase.  I love each and every one of these patterns and hope that you will as well.  Two of these patterns will look familiar as I have blogged about designing them.  There is one more pattern that I hope to have out later this weekend which will be very appropriate seasonally.  Look for it soon.  I'd love to hear your thoughts. 

Wedding Box
 

Mixed Media Witch
 
 
Love is in the Air


Mixed Media Canvas

Merry Belated Christmas to all of you.  My resolution this year to post twice a week was waylaid by the Christmas holiday.  Too many things to do to prepare for the holiday, but I'm back and I still have the same resolution to provide blog posts once a week and twice if my schedule will allow. 

Between designing and blogging this Fall I managed to sign up for 4 online classes, one was with Kelly Rae Roberts, Flying Lessons, which I loved.  If you have never taken her class I would strongly suggest that you take it.  It is inspiring to say the least.  The other 3 classes that I signed up for are from Christy Tomlinson who is an amazing mixed media artist and again I have learned so much, I am about a third of the way through the classes but have a year in which to complete them, but am loving the process.  The success of these classes encouraged me to sign up for another mixed media class called Life Book which begins in January and I am so thrilled to be taking it.  It is a year long class and has a number of different international artists teaching classes throughout the course of the class.  Christy Tomlinson and Kelly Hoernig are just a few of the guest artists.  I have not taken a class for a few years and these online classes are so incredible, for someone who still kind of feels like computers and the Internet are a little like magic, this is a big step for me.  I'll keep you posted on my progress. 

To start us out on the right foot this coming year I thought that I'd post some photos of two canvas projects that I am currently working on.  As many of you know I love working with stencils and have shown you a variety of ways in which to incorporate stencils into your projects.  They are just so easy and there are so many outstanding stencils out on the market at the moment.  I decided to pull out the 4"X4" gallery wrap canvases that I had purchased a while back at Michael's and decided to use my Jacquard paints on them.  I actually have an idea in mind for the set that I am sharing today but am still working on the sketches for them but really wanted to get the color scheme set on the canvases.  I knew that I wanted to incorporate my alcohol inks somehow with this project and also wanted to try painting using my fingers, something that Christy Tomlinson does frequently and amazingly it was a fun liberating experience.  I also knew that I wanted to use the Jacquard Lumiere Metallic paints somehow. 

1.  Blue Canvas:  I began by mixing the Neopaque Blue with White and slip slapped the paint on the canvas to get it covered.  Next pulled out a variety of Lumiere Metallics and using my fingers began to blend the paint around the canvas until I had the look that I wanted and then pulled out my Lime Green Pinata Alcohol Ink and dripped it onto the canvas and finger blended.  Lastly added white snowflakes with a stencil.  It was quick, easy and very effective.

2.  The purple canvas was painted in the same way, different paint colors, added a little sponging to the corners and edges, dribbled Sunbright Yellow Pinata Ink onto the canvas and finger blended.  Added Neopaque Magenta to the edges using a square stencil and used Neopaque Yellow with a swirl stencil.  And loved it. 

3.  The pink canvas was equally fun and was painted in a similar manner to the purple one but with a dot stencil on the edges and swirls on top.  Again I dribbled Sunbright Yellow onto the canvas to enhance the metallic paints. 

I have been a paint layering fan for many years and love how the layered look enhances the background of the canvas, these are actually lovely on their own but really think they will be spectacular once I have added the design elements.  I can't wait to get started on what I have planned to finish these canvases off.  How fun is this?

My next post will show the next set of canvases which are the second set that I referred to earlier in this post.  They are quite different. 


Wednesday, December 12, 2012

Gel Printing Part 3


Part three of my Gel printing journey shows the use of my Gelli Arts Printing plate with a number of different types of textures, bubble wrap, and a variety of my new stencils.  I'm fond of the bubble wrap used in conjunction with the stencils.  The top piece has a bubble wrap texture printed with a lighter green and then I overlayed one of my new stencils.  In the bottom right you see just the bubble wrap and in the piece to the left you can see the bubble wrap with the same stencil but used in a different application.  Love them.  They are fun, quirky, and challenging to do. 

I recently participated in a Christmas card exchange and with the cards that I made and sent out I included tags that I had cut out of the printed papers made using my gel printing plate.  They were fun and would make beautiful gift tags.

As I continue along this journey I will periodically share some of the pieces that I make.  I recently was the happy recipient of three Catalyst Wedge tools by Princeton Brush in a giveaway sponsored by Gelli Arts that I've been using on my Gelli Printing Plate and when I'm happy with some of the results I will share those.  They work great and I am really enjoying the process. 

Sunday, December 2, 2012


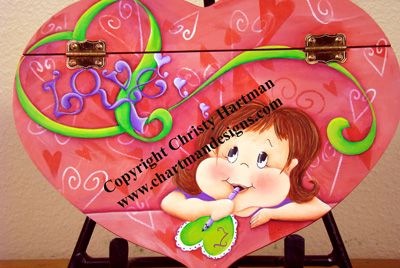
I have been sharing this project as it has progressed from working on the background to now sharing the finished product.   I love her.  I love the background, the lettering, and the little girl.  It all turned out exactly as I had hoped and am happy to report that it is available on my website under the Valentine Pattern Category.  She is too cute and would be darling as a card or painted on this adorable heart box.  The box is available from www.idealwoodproductsinc.com  Wood products from this company are made here in the US and are fantastic to paint on.  The quality of their wood pieces are outstanding.  I hope that you will come on over to my website and see the new pattern and let me know what you think.  I think she is a keeper.  

Wednesday, November 28, 2012

Gell Printing Part 2


In my day job as an art teacher I have been showing my students a few of the You Tube videos from Gelli Arts.  We look for inspiration in so many places and for some of my students I like to use You Tube, in this day and age they all have access to technology and probably watch you Tube but how many of them use it for educational purposes?  I've shown a few of the more recent videos where Joan is using the Catalyst Wedge Tools and my students are fascinated.  I'm generating interest in the gel plates that I ordered to try with my students.  I could only afford 6 plates so we will need to share them.  I'm sure that my students are going to love the process and so do I.  Maybe my enthusiasm for the project is showing and they are catching the vibe.  I still haven't printed anything that I am in love with although I did like the ones that I'm showing above more so than the others.  I'm sure that I will eventually print something that I am happy with but so far feel like such a newbie at the process that I am devouring educational information found on blogs.  I would however recommend purchasing a plate and trying your hand at it.  So fun.

Sunday, November 25, 2012

Prim Look Witch

 
As many of you know who read my blog regularly I like to try new art techniques.  This new pattern incorporates an interest that I've had with mixing media with trying new product.  I used the DecouPage product from Deco Art www.decoart.com when I decided to include scrap booking paper in the background of this design.  I also included a number of stencils from both Laurie Speltz and Renee Mullins and love how this turned out.  This is one of those projects that can be used on so many different surfaces.  This pattern should be on the website very soon, I had hoped to have it on before Halloween but as you can see that didn't turn out so better late than never.  When this pattern is published I have included an alternate background that does not incorporate scrap booking paper into it.  Look for it in the next couple of weeks.  The frame is one by www.idealwoodproductsinc.com, formerly Turns in Time, and I felt that this project needed a frame that was distressed and consequently worked to achieve that.  This frame is made from reclaimed wood and I thought that it would work well for a more prim look for this Halloween design.  I hope that you will love this as much as I do, so far it has been receiving rave reviews from everyone that has viewed it.  Let me know what you think.    

Gelli Arts Printing Plate Part 1

I enjoy an artistic challenge and love to learn new techniques.  I find that when I try something new that may be outside of my comfort zone I take something away that I can use in my own personal art.  Those new challenges make us better artist just through the "experience of it".  The creative activity helps to generate new opportunities that you may have not considered. 

My newest challenge has been in the printing arena and I'm finding that I love it.  If you have been following my blog you know that I have experimented with the media of printing in the past and have cut my own stamps.  My newest interest has been in the area of gel printing and have been following a small company called Gelli Arts www.gelliarts.com for some time now.  I've watched when grow from a start up company to a company that seems to have developed a nice following and is certainly taking the world of gel printing by storm.  I recently took the plunge and purchased one of their gel plates so I could try this fascinating media and have been having a great time.  So far I've thrown out more pieces than I've kept but isn't that part of experiencing a new media and I'm finally ready to share some of what I've done with the plate. 

I've tried many of the techniques that Joan shares on the Gelli Arts Blog and was the very happy winner of one of their give aways this past week and am looking forward to receiving my Princeton Art Catalyst Wedges so I can continue this wonderful new media that I am exploring and I want to thank them for that opportunity. 

I think that if you are a Decorative Painter who is saying, "ok this is cool, but it isn't something that I can wrap my head around to use,"  I think that if you try this you will see that it has so many applications for the Decorative Painting world and I'm working on a new project that will incorporate the printing plate.  Ok, don't worry I will also include the painting instructions in case you aren't quite as enthralled with this new media as I am.  LOL.

If you do the research and are interested in the plates you can purchase the plates, brayer, and Princeton Arts Catalyst Wedges from Dick Blick which is where I purchased mine.  I like one stop shopping and was able to do that through Dick Blick, I recently became a partner with Dick Blick in their affiliate program and you can access the company through my links page on my website.  http://www.chartmandesigns.com/store/WSshowlinks.asp  This link will take you directly to the Dick Blick website.  Google Dick Blick to see if they have any coupons that you can use, they often have unannounced specials in addition to their usual sale flyers.  I was able to save 15% off of my order and that helped pay shipping costs. 

 
This is my first attempt at the wipe out technique that is currently on the Gelli Arts Blog.  It was very fun, but because I didn't have the tools that Joan has I had to use other household items to smear my paint around and I had mixed results.  I can't wait to try it once I get the wedge tools.  You can see that in the bottom left photo I started by adding texture with bubble wrap as my first layer and went on to use the wipe out technique.  I used my Deco Art paint and in the two samples on the right used glitter paints in addition to my Americana paints.   That worked well and I always print a ghost print which is recommended by Joan on her blog and the print below is the result. 
 
 
The sample that you see above was completed by pressing bubble wrap into my paint, lifting that off and pressing a sunburst texture plate into my paint color and printing that.  Next I added orange to my plate and printed using one of those fantastic stencils that I was blogging about earlier this month and printed the orange dots.  This is actually a ghost print because I had too much paint on my plate and my first print didn't turn out well but I liked the ghost print. 
 
What are your thoughts?  Will you try this technique?  Stay tuned for further posts showing other samples.  
 

Monday, November 19, 2012

Head on over to the Gelli Arts blog to sign up for a very exciting giveaway.  www.gelliarts.blogspot.com If you have not tried their new gell plates for mono printing yet, you really should.  I just got mine and have been playing with it most of the weekend.  I'm not that great with it yet to share anything but have fallen in love with it.  It makes gel printing so incredibly easy,  I purchased the 8"x10".  I'd recommend this size but can see how the larger size would be useful and can see how great the smaller one would be.  This is another tool that I have just fallen in love with.  Head on over and take a look at their blog and watch their videos,  see just how easy it is.

Tuesday, November 13, 2012

More Backgrounds and Stencils

Do you remember this background piece that I painted a few weeks ago?  Well I decided to work with it and used the new stencils to alter it pretty significantly.  I think that this will become the background for a card or even to be used in a later project.  I'm going to have to give this some additional thought to see what I decide to do with it.   

What do you think? 

What If I used Stencils in Combination with Background Papers?

The phrase "what if" has been rattling around in the back of my mind for the past few days.  I don't know about you but "what if " thoughts tend to be a part of my life.  What if I had done things differently or what if I'd taken a different path, more often than not those thoughts are filled with relief rather than regret, but in my art life the phrase "what if" takes on a completely different meaning.  What if is usually filled with excitement and anticipation, the what if that accompanies the start of a new project or a light bulb moment.  What if is not a bad statement about my life and it isn't a bad statement where my art is concerned.  I had one of those "what if" moments the other day when I came across background papers that I had worked on a year ago.  I found them in one of my many piles and thought ...HMMMMM!  What if?

I decided to go ahead and put my thoughts into action and began playing around with those background papers. In March 2011 I painted background papers and posted the technique on my blog.  They were a very popular blog post and I've spent the past year thinking what else could I do with them.  I used them for card making and some scrapbooking but I am always thinking of new ways to use an existing project to make it more current.  I thought that I  should take some of those papers that I had made and enhance them.

As many of you know who frequent my blog  I recently did a series of blog posts about using stencils and even invested in some new stencils.  One evening this past week I sat down and thought that I'd play with the new stencils,  and I remembered that stack of background papers and wondered what if I enhanced those.   I picked out one of the nondescript boring papers and thought that I would see what happened.  I began by randomly choosing one of the stencil screens.  I chose the floral stencil, I actually began thinking that I'd design a Christmas themed background but as you can see that didn't happen.

I placed the floral screen onto my nondescript green background paper and used the thinned down acrylics in a spray bottle that I used originally back in 2011, I randomly sprayed primary colors onto the green background.  Because I had used acrylic paint I could easily layer paint colors as long as each layer was dry.  The paint still seemed dull and nondescript.  I obviously needed to find a way to jazz it up a bit and stenciled white flowers over the sprayed stencil.  My next step was to go through some of my paint and find some interesting paints from the Deco Art line.   I decided to use a mix of Metallic, Neon, Glitter and regular paints.   I picked up the sponge and repositioned my stencil over the top of one of the floral areas and sponged blue metallic over the blue sprayed area and a beautiful rich color began to develop.  You will find that this frequently happens when you are working with layered paint colors.  The layering of paint develops a richness and vibrancy that you may not achieve otherwise.   Next I picked up on some red glitter paint on my sponge, repositioned my stencil again and sponged some red glitter paint over the top of the red areas that I had sprayed in the previous application.  Then added red metallic paint randomly to the area.  At that time I wondered "what if"  I picked up some yellow neon and sponged over another one of the stenciled areas and lastly sponged randomly throughout the paper wherever I felt I needed a little ZING.

I don't know about you but I think this piece rivals many scrapbooking papers out there, it was substantially cheaper, and I spruced up a boring nondescript paper.  Now I just need to decide how to use this.  Any suggestions?

Sunday, November 11, 2012

Stenciled Box

I had time to paint this weekend! 

Surprising because my dishwasher died, it has been on its last leg for some time and I was hoping to keep it plugging along until after Christmas but we all know about those best laid plans.  LOL.  Appliances donot always cooperate.  Needless to  say my husband I were out shopping for a new dishwasher today.  I am cooking Thanksgiving dinner and I want to have a functioning dishwasher in time for the holiday.  I have to admit that even with help dishes are not my favorite thing to do.  We found one and it was ON SALE.  WaaHoo!!!  Even better!  At any rate when we got home and after I did a few of my weekend household chores I was able to carve out a small amount of time to paint. 

I am painting this adorable heart box for a new pattern that will be available soon.  I wanted it to have a loose background that I showed you last week as I was stenciling.  I'm sure that you can see the Valentine theme that I've used but my goal is not for this to be used just as a holiday project instead that it could be used year round for someone special.  I've added the design elements and have added the Gesso.  I like to have a white background to paint on and use gesso frequently.  It takes a little more time to add but I think that the result is worth it, I like clean crisp paint colors.  You can see how the stenciled background will work with the finished piece. 

This is the first pattern that I am planning to show you as it progresses.  This is something new in my blogging life and am curious as to how you will enjoy it.  Leave a comment and let me know what you think. 

Thursday, November 8, 2012

Use those stencils.

Ok, so now you have heeded my advise, you've invested in a few good quality useful stencils.   What can you do with them?  Tons!!!!  Note the exclamation marks!!!  Seriously the sky is the limit, they can used on walls, canvas, wood, paper, there isn't a surface around that you can't use a stencil on. 

Twenty years ago my husband and I had just built our current home, we had spent the extra money on solid oak trim for our windows and didn't want to cover them so I stenciled above the windows and used that instead of a valance.  It was cheaper and could easily be changed when I was tired of it.  A friend of mine did a bathroom using the Deco Art Zebra Border stencil with black and pink.  She and her daughter stenciled a wall and added border trim, she showed me a photo of it and it was darling.

Use sections of the stencil to add interest to your background before you begin painting the foreground.  It isn't necessary to use the entire stencil, I like to take portions of a stencil and use only that.  Deco Art has another border stencil called Floral Breeze and the swirls, or as I call them the flourish, is beautiful.  Why not add that to a background with a tone on tone color scheme, it will add interest to your background without being overpowering.  Often we want a plain background but honestly I have found that I like adding a surprise of color, it adds interest and gives your background a hint of texture.  Using your stencil to help layer color gives you a beautiful effect with just the right amount of interest to draw your eye through the entire piece. Or want a dramatic effect?  Try using the compliment of the color that you've used in your background, that should give your painting some drama. 

Another easy way to add texture to a piece is to use a palette knife and smooth texture paste across the surface of the stencil onto your surface, carefully pull the stencil away and you are left with the stenciled image.  Let it dry and paint it as you would the rest of your piece.  This is another great way to add excitement and interest to your background or foreground.  If you want to show swirls to mimic the look of wind blowing in the sky use your stencil/texture paste technique and paint it the same color as the sky and then dry brush a highlight color over the swirl to subtly give the impression of wind.  Gorgeous.  It is simple yet subtle and gives your painting an interesting dimensional feel that is extremely popular right now.  Deco Art carries a fantastic texture paste that I use frequently called Decorating Paste, I used it on a project recently to make fall leaves stand out and I was pleased with the result. 

How about the age old dilemma of whether to use stencil brushes or a sponge?  Honestly it is personal preference and is dependant on the surface.  If I'm stenciling on a small surface and I want the stencil to be subtle then I use a makeup sponge but if I'm stenciling on a wall and I want to show variations in color for shaded areas and highlights then I will use a stencil brush.  Be careful not all stencil brushes are alike and I would recommend that you invest in a good quality stencil brush, do your research and see which one would work well for you.  I frequently use my stencil brushes for purposes other than stenciling, they are amazing for dry brushing. 

I hope this helps you feel confident and comfortable to give stencils a good old college try. 

Stencils used in a Background

Here is a project that I am currently working on and will be available as a pattern in the near future.  You can see how I've used my background colors and stencils to design the background for this box.  I think this would be lovely on its own but naturally I have more to add to it.  The background for this box is finished for now.  I'll add the design to the box lid and then will decided if I think that anything more needs to be added.  I love how the random look in the background will enhance the design that I have planned to put on it and it literally took me a couple of hours from start to finish to get it to this point and that includes prepping the box and sanding it.  In my opinion that is quick and easy. 


I'm curious to see if any of you use stencils in creative and unique ways.  

I love this wooden box, you can purchase this box from www.idealwoodproducts.com. This company was formerly Turns in Time and they produce a wonderful made in America product.  Check them out on their website.  

Wednesday, November 7, 2012

Stencils that I use in my Painting

As I stated before I like to purchase tools that make my job as an artist easier and allow me to be more efficient and in the process more creative.  I love all types of art tools, paint brushes, different paints, different mediums, and love to learn new techniques.  You can see that on my blog and website just by the paint brushes that I carry.  I like to have my tools easily accessible and of a quality that I'm satisfied with the result after using them.  Stencils are one of those tools that I find to be extremely useful and allow me the consistent result that I strive for.

Staedtler is another company that produces a great quality stencil or as they prefer to call them a template tool.  These were designed as a drawing aid but work brilliantly as a stencil.  I particularly like the sizes that are in descending order and find that the variety of sizes and shapes that are available make them a very versatile tool, even if you don't want to use them as stencils they are invaluable in drawing basic shapes.  I have larger sized oval and circle templates that I use often as well.  Take a look at these as a good general tool in your design and art work.  I will say that these tend to be slightly more expensive than a stencil and that can be hard to justify, when you are on a budget, which many of us are.   However they wear like iron because they are a hard plastic that will be dependable whether you are using them with paint or as a template drawing tool. 

These can be purchased at many art/business supply stores.  Dick Blick carries a wonderful selection, I've ordered from Dick Blick as an art teacher and as an artist and I can guarantee that they are easy to work with and stand behind their product. 

Staedtler is not the only company that produces this type of product, take a look at these as a tool that you might want to add to your collection.  I assure you that you won't be disappointed. 

Tuesday, November 6, 2012

Tools of the Painting Trade

Whenever the topic of stencils comes up it seems to generate strong feelings.  I personally love stencils and use them frequently in many of my designs, stencils are a quick and easy way to develop a background or add interesting detail.  In just a few minutes an artist can add stars to a sky or to a Santa's coat and it requires very little skill.  Anytime that I can use a tool that makes my job easier I'm all for it, whether it is around my house or as an artist.  You can see in this photo the stars on this Santa's coat which were all done using a stencil and it literally took me moments.  This pattern is called First Star of Christmas and is available on my website as both a paper pattern and as an e-pattern. 

I have a decent collection of stencils and have a few that I seem to use more often than others probably because they are of very high quality and produce a consistent image.  I also have a number of newer ones that I recently used in a soon to be released Halloween design that I purchased from Renee Mullins.  www.plumpurdy.com Bat Night, Candy Corn, and Spooky Words, all of which were excellent stencils and were a great size to be easy to use on any surface.  They are 8.5" X 5.5" which is smaller than many stencils but made them very easy and comfortable to use.  Another fantastic stencil that I've used is made by Laurie Speltz www.lauriespeltz.com.  Laurie started developing a line of stencils many years ago which she called base coat stencils, made in layers so that you could start with the base coat and move through to adding details.  They were wildly popular with anyone painting for shows and were a brilliant idea.  I've also used a number of her stencils and can attest to the fact that they are another quality stencil product. 

Typically when I purchase a stencil I have a specific use in mind but just recently decided that I needed generic stencils that I can use at any time in the foreground or background.  I only recently discovered these stencils and just received them in the mail as of yet I haven't had a chance to use them but am looking forward to trying them out.  I've ordered an interesting assortment and really can't wait to use them on a future project. 

 
Do any of you know of any interesting stencils?  I'd love to hear of different brands that I haven't tried yet.  

Sunday, November 4, 2012

#2 in Background Papers 2012

When I sat down to paint these background papers I didn't really have a goal in mind other than to just spend some time playing with paint.  Remember that "play" from my last post.  I added a number of random paint colors to my palette and just started laying down color, making sure to allow each layer to dry before continuing on to the next, in fact I painted this in a mass production format.  I laid out 5 papers and walked around the table adding various colors to each paper.  All I used was inexpensive computer paper and my acrylic paints.  As I got to this one I decided that I wanted the background to have more of a mottled look to it and triple loaded my brush with various shades of blue and just started slip slapping my brush out onto the paper, then thought that I'd dab bits of white and pink in a random manner and voila this is what came about.  I actually really liked this one and thought that the paint colors were very sweet and reminded me of babies.  Maybe it would be great for a baby scrapbook page or a card. 

I laughed when I was scanning these that out of the five I only scanned three to post, in fact I was pretty happy with that.  I only had to throw away two of them, often I throw away all of them.  LOL.  The point I'm making is that this is an exercise in creativity, not intended to produce great works of art, if it does then great but if not then they are round filed.  These may end up having additional paint added on to them before I ever use them but for now I'm holding onto them for future use.   

How many of you have some wonderful activity that you use to help you when you are experiencing a creative block or to just get the creative juices flowing?  I'd love to hear the techniques that you all use.  Wouldn't that be a great topic of conversation?  Leave me a comment and lets see if we can give each other new ideas and techniques to use. 

Wednesday, October 31, 2012

Happy Halloween

Every year all the teachers that work in my hallway at school dress up with a theme and we have a ball doing it, one year we all dressed up as laundry baskets.  Here is a visual for you... I'm an art teacher and I spend my day moving around my classroom helping children who are messy and using a variety of media.  My classroom for an art room is fairly small and my tables are fairly large with relatively large classes of kids from Kindergarten to 8th grade.  Needless to say there isn't a lot of room and the laundry basket just wasn't cuttin' the mustard for me.  I put the costume on when each class came into my room and then quickly got out of it because it was driving me crazy.  Luckily all I had to do was step out of it and remove the suspenders,  The following year I decided that I needed an easier dressing up idea and came up with the idea to paint a men's long sleeved t-shirt to wear as a tunic.  That year our theme was candy and I painted candy corn on my shirt.  I was comfortable and received so many compliments during the day that I knew I had a hit. 

I used Deco Art So Soft Paints to paint the candy corn on the front of the shirt and the pumpkins on the back .  So Soft Paints are a wonderful fabric paint and really are soft when you have completed the painting.  They also wash wonderfully.  I also added glitter detail on each of these pieces but glitter doesn't photograph particularly well. 


A few years later our hallway theme was witches and I decided to paint a huge witches face on a black shirt.  This witch is not completely my own design, I knew that I had an old Diana Marcum book somewhere in my stash that had a great witches face in it and I also remembered a Holly Hanley witch design that I had somewhere and combined the two and added some of my own detail and again painted them with the Deco Art So Soft Paints.


Tuesday, October 30, 2012

Background Papers 2012

Happy Halloween! 

As many of you know I enjoy painting my own background papers to use in collage, scrapbooking, cardmaking, or just for the fun of painting these crazy papers.  How could you not love doing these, the creative freedom that you experience is so liberating.  It is such a wonderful right brained activity, many of you enjoy Zentangle and I do too, however I find this to be just as creatively stimulating as many of you do with the "Zen" of Zentangle.  In fact I often allow my students to "play" with paint when we are exploring color or just have some free painting time.  They love it and do not even realize that in their "play" they are learning such valuable color theory lessons. 

These two orange papers remind me of Halloween and I plan to use them as a background papers for a few new Whimsy Stamps www.whimsystamps.com that I just received.  I love the play of yellow, orange, white, red, and a little turquoise thrown in to add a little compliment to the layers.