Sunday, September 22, 2013

Home-made Acrylic Sprays


Last post we discussed the joys of using purchased sprays and I do love them!!!!  But…..I also love using the sprays that I make myself.  So easy and inexpensive to do, use your acrylic paint and an inexpensive spray bottle.  Seriously that is it!!!  I would not use your more expensive misters that you purchase, the acrylic paints will clog up the sprayer mechanism and it’s an easy fix but….. Why chance it?  I use spray bottles that I purchase at my local Walmart which have a body mist in them and are found in the travel size, they are perfect for this purpose and cheaper than purchasing a more expensive mister.  I emptied the body mist out of them, you can save that if you prefer, I don’t like body mist so I just dumped it out, rinse it out fairly well, add a small amount of paint to the misting bottle, add cold water to thin, shake to dilute the paint, and spray test on paper.  Adjust your amount of paint depending on the color intensity that you want.  You can use these just like any other spray but the beauty of these is that once they are applied and set up they are permanent.  Depending on your purpose that might be more desirable to you.  If your mister clogs up, remove the sprayer from the bottle and place it in a cup of hot water and spray the hot water through the mister until it works properly and then replace it in your paint bottle and continue spraying.  Just a minor inconvenience!  If you have acrylic inks you could also use those instead of paint, but be careful using your alcohol inks as a spray.  Alcohol inks and acrylic inks are a completely different formula and please check out safety concerns before you spray an alcohol ink solution.  Just sayin!!!  Do your homework to stay safe when painting.  You can also purchase the empty travel sized spray bottles but I found that the spray varied in each bottle so test them prior to using to make sure you are happy with the resulting spray application. 


I have a rather lengthy description of this process and how I used these sprays to make background papers for cards or scrapbooking under my blog archives of February – March of 2011. 


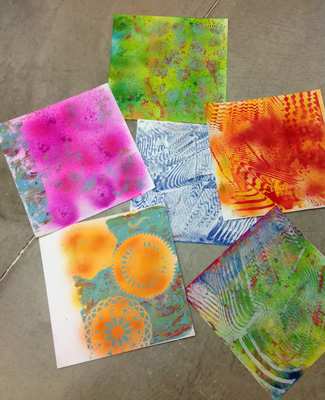
As many of you know who follow me on my blog I love stencils!!!  Love them and use them regularly in my design work.  So easy and such a popular trend right now.  There are so many wonderful stencils on the market from companies that are specializing in stencil designs to artists that have manufactured their own line of stencils.  Some of these names you are going to be familiar with while others might be new to you but I have tested stencils from each company and can personally vouch for their quality:  Laurie Speltz, Patty Rawlinson, The Crafters Workshop, Kaisercraft, Christy Tomlinson, Prima, Stencil Girl to name just a few.    http://stencilgirlproducts.com/  http://www.thecraftersworkshop.com/The_Crafters_Workshop/Home.html   Why not combine your inks with these amazing stencils to make spectacular journal pages or add them to a background on either a canvas or a decorative painting project?  Have fun and share the result.

 Also another plus is that my family doesn’t hassle me about my art hoarding when I am using materials that I already own.  WaaHoo!!! 

Sunday, September 15, 2013

Art Junkie? or Enthusiast?


I am a self-proclaimed art junkie, I admit it I love art supplies.  I love the colors, textures, and the potential; consequently to fuel my addiction I keep up with the trends.   Do any of you have this same dilemma?  My daughter even suggested, much to my dismay that my painting room was starting to resemble that of a hoarder.  Naturally (imagine my shock and annoyance) I suggested that I only needed a bigger space.  Do any of you have family members who would like to hold an intervention for you?  If so then we are in good company.  “Giggles and grins.” 


When I sat down to write this post the thought of that blank page staring at me was a little unnerving.   Those same feelings exist when I sit down to work on a journal page but being a can-do type of person thought to myself…. Then get rid of the white page!!!  Easy solution.  One new exciting trend in the art world is that of ink sprays, so cool and so many options to choose from.  The thought of quickly being able to get rid of that white scary space is liberating.  Being the art junkie that I am decided that I absolutely had to have a set of sprays!  But which ones to purchase?  Knowing that my husband and children would be calling an intervention specialist I decided that I needed to choose one brand and stick with it.  I started doing research and discovered this talented, crazy British woman by the name of Dyan Reaveley and her Dylusions line by Ranger.  She has a line of stencils, stamps, ink sprays, and a terrific series of You Tube videos for educational purposes.  That was right up my alley and I ordered the set.  Tried them out and loved them as well as loving her quirky nature and sense of style.  Check her out and see if you don’t just love her as well, I think that she would be a fun friend. 


Most sprays are water based which means that you need to do some planning if you don’t want to end up with muddy color applications; it also means that even when the sprays have set they may reactivate when you add subsequent layers.  Not a problem, just use a spray fixative in between your layers.  HMMMM!!!  Imagine the possibilities; this is the beauty and the frustration of spray application.   It also allows for the freedom to enjoy happy accidents occurring as you work.  Don’t like the random spray application?   Any of these sprays can also be painted with just like you would a watercolor.   I think that is brilliant! 


My next dilemma presented itself!  Dyan came out with new ink colors!  Oh No!  What to do?  Naturally I ordered them along with some of her stamps and stencils.  Oh well, my husband has been planning to build a storage shed out back, that should solve my current storage problem. 

Sunday, September 8, 2013

Gelli Printing on a Cold, Wet, Rainy, Day

Got up this morning to a cold rainy day and thought that it was a perfect opportunity to play with my new Gelli Plate.  I received the larger 10"X14" sized plate as a gift, already owned the 8"X10", and really hadn't had time to play much with it, got it out and had a really fun afternoon.  The size is great especially when I used my Catalyst Wedge tools, the size allowed for really using the wedge tools in a larger space which had frustrated me on my 8"X10".  I had wanted more space to wipe the paint off and get some fun results.  I also tried a number of techniques that I had learned when I took a Carolyn Dube online class. 

I used a number of different stencils, paint, Catalyst Wedge Tools and white cardstock.  I actually am going to make some cards using my new stamps and really wanted something totally different to use as background paper and couldn't seem to find anything that appealed to me out of my stock of Gelli Prints that I've done in the past.  I wanted something different than I had in my stockpiled scrapbooking papers as well and think that I have a couple papers which will do nicely. 

Here I used a combination of Catalyst Wedge Tools and a stencil to prep the Gelli Plate.  Have you tried the Wedge Tools?  Fun stuff!!!

Adding a variety of paint colors.  You do not need a large amount of paint to use the Gelli Plate depending on the technique that you want to use. 

Assorted stencils used on this print.  Sometimes they turn out like you hope and other times they get printed over.  It is a crap shoot for me usually.  I try to plan my prints but most of the time they are either happy or unhappy accidents. 

I like this one and then added my Dylusions Sprays to the background to jazz the print up a bit.  I may even add more stenciling to it eventually. 


These were my happy accidents.  LOL.  I like these and added Dylusions Sprays to the background of quite a few of these with the exception of the one in the very center.  Maybe these will show up eventually in another project.  HMMMM!!!!! 

Wednesday, September 4, 2013

Another Mixed Media Canvas Displaying the Jump for Joy Characters

The little mummy also blends in with the canvas and I'm not sure I like her on this canvas.  If I were to do this again I think that I'd change my background colors for this character. 

What do you think? 

Another Mixed Media Canvas Displaying the Jump for Joy Characters.


Frankie kind of blends in with the canvas and I like it.  I don't see that as a problem but if you had concerns you could easily change out your paint colors for the canvas. 

Can't wait to hear your thoughts!!!

Check back later on to see the third character displayed on this canvas. 

Another Mixed Media Canvas Displaying the Jump for Joy Characters

 
Here you can see the Jump for Joy Witchie added to the mixed media canvas and I think the combination of canvas and witch is darling.  I used Sticky Tack to add the wooden witch to the canvas and it works brilliantly, that way I can change out my characters as I please but I could easily have hot glued the wood piece to the canvas or even painted her right on the canvas. 
 
What would you do with these characters?  How would you display them?
 
Check back later this week to see two of the other characters added to this canvas. 

Monday, September 2, 2013

Another Mixed Media Canvas for the Jump for Joy Characters

I just can't seem to stop designing these fun canvases and then love adding the Jump for Joy Characters to see how they will look and I love them!!!!!!!!!!!!!  I'm seriously considering doing some smaller sized canvases for example a 4"X4" or a 3"X3" or even smaller and using my stamps from Jody Stacy at Treasured Time Rubber Stamping to stamp the image and then then paint them.  When Jody gets my Christmas stamps finished I think these will be darling as ornaments and the size is perfect.  Can't wait to try this!!!!

This canvas is a 6"X6" gallery wrapped canvas and I first started with neon Deco Art Americana Paints and a variety of scrapbooking papers that I decoupaged onto the canvas.  The scrapbooking papers that I used were left over from another project that I did and they seemed to work beautifully on this canvas.  Then I started layering stencils onto the canvas in a variety of random locations.  These were new stencils from Mary Beth Shaw at www.stencilgirlproducts.com and I loved them. 

Spider Web Stencil L081 This is one of the best spider web stencils I have ever used.  The quality is amazing and I would recommend it highly.  I'm sure you can look at the canvas and see where it was used.  One of the best things about stencils is the ability to place the stencil on the area and so see how it will look once the paint is applied.  I love that about stencils. 

 
This is another Stencil Girl stencil and I love how versatile this one is, so many different uses in this 9"X12" stencil.   This is the Eights Stencil L130.  I would recommend this company very highly to all of you who love stencils like I do. 
 

Here are the photos of the finished canvas and as you can see I also added another of my faves, Washi Tape.  Tomorrow I will start sharing the canvas with the Jump for Joy characters added to it so stay tuned. 
 
What do you think?